Models
Activities & instructional plans to make & explore models
- Big ideas, concepts, facts, & outcomes
- Content concepts, facts, & outcomes
- Process concepts, facts, & outcomes
- Attitudes
- Scoring guide suggestions
Introduction
This page includes plans to review and facilitate deeper understanding of models as explanations. Activities include puzzles, black boxes, and more as listed in the overview as the title of their lesson plan.
- Many objects cannot be seen directly, models help us understand them.
- Models help represent and explain objects, such as how the world works.
- Models can come in different forms and at any scale.
- Models can be physical objects, plans, mental constructs, mathematical equations and computer simulations.
Models are always wrong. Some are more complete than others.
Learner's background knowledge
It is helpful for learners to have prior knowledge in
- cause and effect
- desire to explain
- observation & inference
There is certainly a developmental nature in what learners can understand and how they use models.
Young learners view a model and a real object as separate objects with the only connection of looking similar. A toy car is an object with which to play. A real car is to drive.
Model has the effect of internalizing or abstracting understanding.
Intended learnings & learners thinkings
See for more information on what to include in planning
Big ideas, concepts, facts, and outcomes
Concept sequence map used for planning
Content concepts or outcomes vary by the topic being modeled.
(Source of concepts, outcomes, & misconceptions)
Process - evidence & models (
Big ideas:
"Models are tentative schemes or structures that correspond to real objects, events, or classes of events, and that have explanatory power. Models help scientists and engineers understand how things work. Models take many forms including physical objects, plans, mental constructs, mathematical equations, and computer simulations."National Science Education Standards (Page 117)
See process Concepts & misconceptions - evidence & models
Related concepts and facts
- Models are structures that correspond to real objects, events, or classes of events that have explanatory and predictive power (physical objects, plans, mental constructs, mathematical equations, computer simulations...) that may or may not be observed with real objects, systems, and events.
- Model is an explanation based on observations, facts, laws, inferences, thought, and reasoning.
- Models represent systems or things used as an example to follow or imitate to provide an explanation.
- Models can be used to think about events or processes that happen very slow, fast, or on a too small or large scale to change easily or safely.
- Mathematical models can be displayed on computers and changed to see what happens.
- Models are used to represent things in all dimensions of science physical, earth, and life science.
- Scientists use models.
- A model though different from the real thing can be used to learn something about the real thing.
- Seeing how a model changes may suggest how the real thing works if the same were done to it.
- Models make predictions.
- More than one model can represent the same thing or event.
- The kind of model and its complexity depend on the purpose of using the model.
- Models are never exact representations.
- A model that is too limited or complicated may not be useful.
- A model represents entities and the relationships between them.
- There are two basic types of models, physical and conceptual. Conceptual communicate through words and drawings, or can be physical and demonstrable.
- Models help generate ideas, solve problems, make predictions, help think.
- Model helps me internalizing or abstracting understanding.
- Models can be used to represent new ideas and inventions.
- The application and the use of models in science and technology can and will benefit society.
- Black boxes are used to describe something that cannot be observed or understood easily.
Outcome - model
Project 2061 includes Models as a common theme and defines the following benchmarks in Benchmarks for Science Literacy Project 2061 American Association for the Advancement of Science.
By the end of the 2nd grade, students should know that:
- Many of the toys children play with are like real things only in some ways. They are not the same size, are missing many details, or are not able to do all of the same things.
- A model of something is different from the real thing but can be used to learn something about the real thing.
- One way to describe something is to say how it is like something else.
By the end of the 5th grade, students should know that:
- Seeing how a model works after changes are made to it may suggest how the real thing would work if the same were done to it.
- Geometric figures, number sequences, graphs, diagrams, sketches, number lines, maps, and stories can be used to represent objects, events, and processes in the real world, although such representations can never be exact in every detail.
By the end of the 8th grade, students should know that
a. Models are often used to think about processes that happen too slowly, too quickly, or on too small a scale to observe directly, or that are too vast to be changed deliberately, or that are potentially dangerous.
b. Mathematical models can be displayed on a computer and then modified to see what happens.
c. Different models can be used to represent the same thing. What kind of model to use and how complex it should be depends on its purpose. The usefulness of a model may be limited if it is too simple or if it is needlessly complicated. Choosing a useful model is one of the instances in which intuition and creativity come into play in science, mathematics, and engineering.
Specific outcomes -
Recognize models can be represented by
- Physical objects: model car, visible engine, visible women, visible man, pop bottle lung, joints of the body, planetarium, spheres to represent the Sun, Moon, and Earth rotation and revolution,
- Drawings: maps, plans, schematics, before and after pictures, charts, graphs, organizations of data, Venn diagrams, tree diagrams to organize outcomes
- Mental constructs: Constructs to explain how electricity flows in a closed circuit, how objects expand and contract with temperature change, mental image of density, mental image of an atom and its subatomic particles, magnetic field, flow of water through plants, pressure and density change in a Cartesian diver, gravity, light, heat, sound, motion,
- Mathematical equations: graphs to show relationships, linear and non linear graphs and each relationship can be described by an equation.
- Computer simulations: Sim City, Sim Ants,
Scoring guides suggestions (rubric)
Model (scoring guide)
Top level
- Models are structures that correspond to real objects, events, or classes of events that have explanatory and predictive power (physical objects, plans, mental constructs, mathematical equations, computer simulations...) that may or may not be observed with real objects, systems, and events.
- Model is a small scale of a real thing. (hot wheels car, doll house, ... )
- A model is a toy not the real thing. Doesn't recognize a useful explanatory or predictive value.
Lower level
Strategies to achieve educational learnings
Pedagogical background knowledge
- Learning cycle instructional method
- Human development of intellectual thinking - tasks to use with learners across all ages, directions, materials, variety of responses with explanations.
- Learning theory - how humans learn from infant to adult. A constructivist model with a Piagetian base. Includes learning procedure, flow chart, variables that effect learning, what changes & doesn't change, explanations for children's thinking as naive understandings or misconceptions, physical activities that develop intelligence, logic and other thinking skills. Explains development over time:
Instructional Procedure
Pedagogical Overview
Activities Sequence to provide sufficient opportunities for students to achieve the targeted outcomes.
Make sure students have the prior knowledge identified in the background information.
Compare a model to the real object. Play car - real car
Water cycle model explain what happens but not know how or why How did drawing help you construct your understanding and how to think about the task.
- Activity 1 - Black box
- Activity 2 - Mystery pipe - make a model for how the mystery pipe operates
- Activity 3 - Insect condominiums
- Activity 4 - Expanding universe
- Activity 5 - Earth changes - earthquake?
- Activity 6 - Recycled water
- Activity 7 - Glaciers
- Activity 8 - Hum dingers
- Activity 9 - Drought stopper
- Activity 10 - Fog chamber - cloud?
- Activity 11 - Go carts
- Activity 12 - Cart tricks
- Activity 13 - Electric circuits
- Activity 14 - Moon craters
Focus question
Unit focus question:
- What is a model and how do make them?
- What is on of the most helpful ways to understand and communicate what something is and how it works?
Sub focus questions:
- What are
- How do
Resources and Materials
- Lab notes three generic sheets
- Activity 1 -
- Activity 2 -
- Activity 3 -
Lesson Plans
Activity Black boxes
Materials:
- Two black boxes for each group (see below).
- We used a VHS videotape box, a one-inch wooden sphere or marble, and a one-inch thick piece of foam to cut the puzzle pattern. The VHS video box had two rings that supported the tape. We used a chisel to remove them and glued the foam into the box. Next we inserted the sphere and glued the tabs before closing the box.


Focus questions:
- How do explain something you can't see?
- What are models?
- What do models represent?
- How do models relate to the real world?
Learning outcomes:
- Create a model for two black boxes that is 90% accurate.
Suggested procedures overview:
- Put students in groups, focus their attention, and assess their initial understanding of the focus questions.
- Share the black boxes and ask them to make a diagram for what they think is happening inside.
- Have each group draw their models for each black box.
- Have each group explain their model to the others.
- While there will probably be differences of opinion suggest they start with what is the same.
- For example all may agree that the sphere will move without obstruction in a certain area of a box.
- Mark that on all drawings.
- Continue exploration to see if there can be agreement for other areas of a box.
- Can conclude with areas that they establish as likely and others that are questionable and need more accurate observable data. For example all may agree there is a triangle obstruction in one, but disagree as to the size. Okay good enough. In the other there will likely be disagreements as to the shapes of all three sides that can interact with the sphere. However, they may agree the sphere will slide past two sides, but get stuck on the third. Okay good enough.
- Complete notebook.
Exploration (Explore, Focus, Engage, Categorize)
- Ask. How do scientists understand things that they can’t see.
- Show the learners a black box.
- Ask. What do you think could be inside?
- Tell. When scientists have to figure things they are often not able to see inside.
- Ask. What suggestions do you have for how to figure out what is inside without opening it.
- When they suggest moving it or listening to it, then ...
- Lightly move it so they can hear the sphere roll.
- Ask. Can you determine the shape of the space inside the box, without destroying it?
- Put learners in groups, focus their attention, and assess their initial understanding of the focus questions.
- Review rules:
- Do not open the box;
- No hard shaking;
- Do not write on the box.
- Take turns with the box.
- Record what you think the black box looks like inside in your lab notes.
- It's okay if different people in the group have different ideas.
- Share the black boxes and ask them to make a diagram for what they think is happening inside.
- Have each group draw their models for each black box so all can view.
Invention (Invent, Construct, Negotiate, Explain)
- Bring the class together.
- Have each group explain their model to the others.
- If students don’t agree with certain things let them know that is okay.
- Have them decide what they agree on and mark that on the board.
- For example all may agree that the marble will travel all along one side but disagree on what the shape of the area where the marble can’t get into, but agree that the marble can’t get into the bottom left corner.
- While there will probably be differences of opinion suggest they start with what is the same.
- For example all may agree that the sphere will move without obstruction in a certain area of a box.
- Mark that on all drawings on the board.
- Continue exploration to see if there can be agreement for other areas of a box.
- Can conclude with areas that they establish as likely and others that are questionable and need more accurate observable data. For example all may agree there is a triangle obstruction in one, but disagree as to the size. Okay good enough. In the other there will likely be disagreements as to the shapes of all three sides that can interact with the sphere. However, they may agree the sphere will slide past two sides, but get stuck on the third. Okay good enough.
- Ask. What is a model?
- What examples can you give for how scientists use models?
- Ask. What examples of black boxes do we use daily?
- Ask. How did listening to each other help you learn?
Discovery (Translate, Elaborate, Extend)
- Ask. What in our world is like a black box?
Activity 2 - Mystery pipe
Materials:
- Mystery pipe

Practice pulling the strings so you can make it operate in two ways.
- When pulling one string it appears to only operate the string directly opposite it.
- Pulling the string so it operates another on the other end of the pipe.
Focus questions:
- Can you make a model to explain how the mystery pipe operates.
Learning outcomes:
- Make a model that explains how the mystery pipe operates.
Suggested procedures overview:
- Put students in groups, focus their attention, and assess their initial understanding of the focus questions.
- Demonstrate what happens when one string is pulled.
- Learners draw a model for how they think the strings are connected inside the pipe.
- Operate the pipe so a string moves on the other end of the pipe.
- Have learners redo their model so it explains both operations.
Exploration (Explore, Focus, Engage, Categorize)
- Ask. Want to explain a puzzle or solve a problem.
- Show the pipe and explain you are not sure how it works and want them to help you think of how it might be made.
- If they say. Just open it, say it is sealed. And if you open it, you can't be sure that won't change what is inside. And you would rather not break it, but leave it as it is.
- SO ... here is what happens ...
- Demonstrate what happens when one string is pulled.
- Let them discuss and have them
- Draw a model for how they think the strings are connected inside the pipe.
- Then ...
Invention (Invent, Construct, Negotiate, Explain)
- Operate the pipe so a string moves on the other end of the pipe.
- Have learners redo their model so it explains both operations.
- When complete, they may be frustrated because you limited their ability to try different operations.
- Ask. Well what if each time you operated it, It cost a million dollars? would you want to limit the experiments? If they think the price is outrageous, agree and ask how much does it cost to experiment with a rocket launch? or ....
- Tell them that just for them you will pay for all the experiments they desire and demonstrate what they ask.
- Let them redo their model.
- Share and see if there is agreement that their models accurately explain the observations.
- Ask. How often do you think people who make models need to adjust or change them?
- How does that describe science?
Discovery (Translate, Elaborate, Extend)
- More models ...
Activity 3 - Insect Condominiums
Materials
- Various sizes and shapes of clear plastic containers (brought from home), clear packing tape, netting (pantyhose, cheesecloth), markers, scissors, ground cover, insect food, twigs, grass, etc.
Expanding Universe 4. Earth Changes 5. Recycled Water 6. Glacier Climbing
Focus questions:
- How do explain something you can't see?
- What are models?
- What do models represent?
- How do models relate to the real world?
Learning outcomes:
- Create an insect habitat modeled after the environment in which they live.
Suggested procedure overview:
- Put learners in groups, focus their attention, and assess their initial understanding of the focus questions.
- Complete notebook.
Exploration (Explore, Focus, Engage, Categorize)
- Put learners in groups of two or three.
- Ask. What do insects need in their environment.
- Make a list of their ideas on the board.
- Ask. Would you like to create an environment for an insect to live?
- Okay. First we should make a drawing or blueprint of the environment that will provide their insect with all its essential needs.
- Let learners work in groups to prepare a plan.
- Share plans with the class and explain how their environment will meet the needs of the insect.
- Check to see it meets the needs for survival.
- Must include feeding and watering system.
- Have the students suggest where to find the materials for the environment.
- Build environment based on blueprint.
- When done with building environment put insects in their home.
Invention (Invent, Construct, Negotiate, Explain)
- Made predictions about what the insects will do over the next 2 days, 1 week and 2 weeks.
- Discuss what to record on a daily journal of observations made about the environment.
- Periodically discuss how the created environment is similar to the natural environment.
- Ask. Is their insect condominium a model?
- Give reasons why or why not.
- Ask. How does this kind of activity relate to what scientists do?
- How might you use what you learned?
- Share something you learned from others and how they learned it.
- Have them to give the whole class three cheers for helping each other learn.
Discovery (Translate, Elaborate, Extend)
- Review. We have explored
Activity Expanding Universe
Materials:
- pens of different colors, large round balloon, metric tape measure, string
Focus questions:
- Any one ever heard of the Big bang? or Expanding universe?
Learning outcomes:
- Mark and blow up a balloon.
- Describe how the balloon is a model for the expanding universe.
- Explain how the expanding balloon is a model.
Suggested procedures overview:
- Put students in groups, focus their attention, and assess their initial understanding of the focus questions.
- Complete notebook.
Exploration (Explore, Focus, Engage, Categorize)
- Put learners in groups of two.
- Ask. What they know about the Big Bang model of the universe.
- Ask. How do scientists speculate about something that happened before humans existed to observe it?
- Pass out a balloon to each pair of learners.
- Have them draw a red dot anywhere on the empty balloon.
- Using a different color draw 4 more dots on the balloon different distances from the first dot.
- Number the 4 new dots 1, 2, 3, and 4.
- Measure the distance from each dot to the first dot you drew and record.
- Blow up the balloon a little way and hold it shut with your fingers.
- Observe the balloon and the positions of the dots.
- Repeat step 6.
- Blow up balloon to its full size and repeat measurements.
Invention (Invent, Construct, Negotiate, Explain)
- Ask. What do the red dots represents? Earth, suns, galaxies ...
- Ask. What the other dots represent? Earth, suns, galaxies ...
- Ask. What does the balloon represent. boundaries of the universe
- Have them interpret the data they collected and have a class discussion about the movement of the dots.
- Ask. How do you think scientists thought of the big-bang theory?
- How do scientist think of explanations for other ideas in the solar system and universe?
- How is this like or not like a model?
Discovery (Translate, Elaborate, Extend)
- Ask. What other kinds of models do you know of that show how something changes?
Activity Earth Changes
Materials:
- two strips of cloth or plastic (big enough to hang over edge of pan), cake pan, damp soil, toys (houses, cars, bridges)
Focus questions:
- What do you know about earthquakes?
Earthquake bends railroad tracks
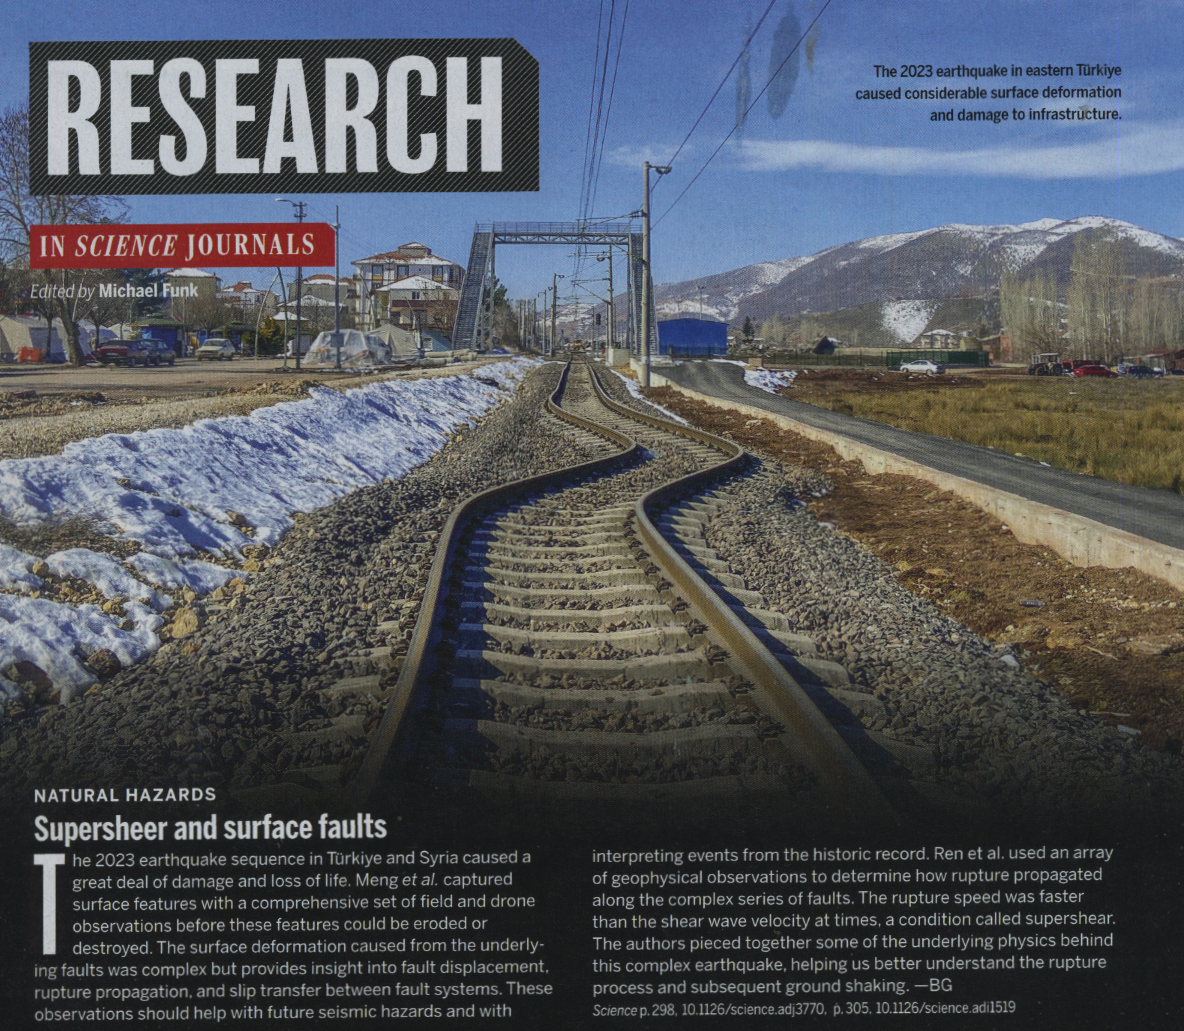
Land and earthquake effects
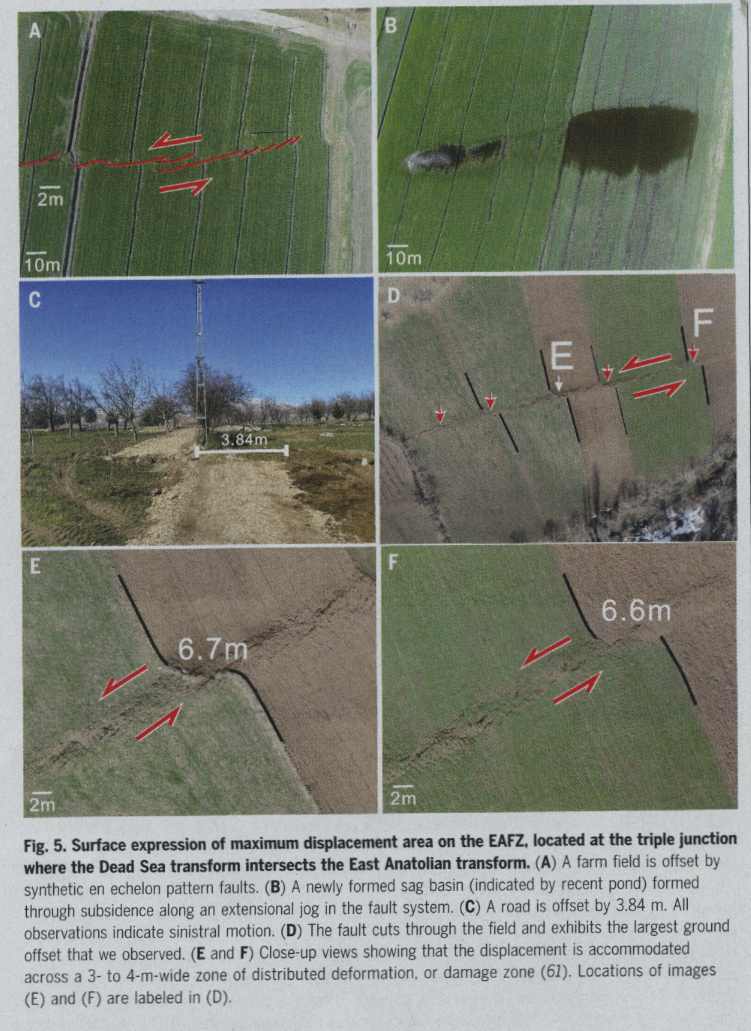
Source Science January 19, 2024
Learning outcomes:
- Construct a model of the Earth with moving plates.
- Explain how the model relates to a dynamic earth.
Suggested procedures overview:
- Put students in groups, focus their attention, and assess their initial understanding of the focus questions.
- Complete notebook.
Exploration (Explore, Focus, Engage, Categorize)
- Ask. What is an earthquake?
- Ask. How do earthquakes effect the land and human made environment?
- Share the photo of the railroad tracks (human made environment) and ask how could the Earth cause them to bend?
- Ask. How cold we model what happens?
- Give the following directions to the students.
- Lay strips of cloth or plastic next to each other in the bottom of the cake pan.
- Let the excess length of one strip hang over the edge of the pan and the other hang over the other end.
- Cover the strips with damp soil up to the edge of the pan
- Pack it down firmly.
- Place toys on top of the soil.
- Slowly pull the protruding strip at one end and the other at the other end at the same time.
- Observe and record what happens to the soil and toys on the soil.
- Put learners into groups according to the amount of materials that are available.
- Have them do the experiment and then come back together as a class.
Invention (Invent, Construct, Negotiate, Explain)
- Have each team report on their findings.
- Ask. What was similar and or different with each?
- Ask. How this was similar to what might occur on Earth?
- Ask. How it is different?
- Ask. Is this a model?
- Why or why not?
- Ask. How scientists might use the ideas that they used.
Discovery (Translate, Elaborate, Extend)
- Ask. What other kinds of models might be similar to the Earth moving plates model.
Activity Recycled Water
Materials:
- soil, 2-liter plastic bottle (must be clear), one plant, gravel or stone, water, scissors
- Activities to developing understanding of water cycle ...
(condensation, evaporation ...)
Focus questions:
- What is the water cycle?
- How could we make a model to demonstrate a water cycle?
Learning outcomes:
- Make a model water cycle model and explain how it is similar and different to the Earth's water cycle.
Suggested procedures overview:
- Put students in groups, focus their attention, and assess their initial understanding of the focus questions.
- Crete a watercycle model and discuss how it works and how it is a model.
Exploration (Explore, Focus, Engage, Categorize)
- Ask. What they know about the water cycle?
- Ask. Does the amount of water on the Earth change?
- Give the following directions:
- Cut the 2-liter bottle in two pieces at the top of the hard plastic base.
- Remove the softer plastic from the inside of the hard plastic bottom, if possible.
- Place a layer of stones on the bottom of the clear plastic and add three to four inches of soil.
- Put the plant in the container, making sure that the soil is firm around the roots.
- Add one to two tablespoons of water depending on how moist the soil is.
- Create groups according to the amount of materials that are available.
- Place the terrarium in the light and observe it over 24 hours.
Invention (Invent, Construct, Negotiate, Explain)
- If the water cycle is working, water droplets, condensation, will form over time inside the dome.
- When enough condensations forms, it will rain and water the plants.
- Ask. Is this a model?
- Why or why not?
- Ask. How scientists might use the ideas they used.
- Discuss how a model helps understand the water cycle.
Discovery (Translate, Elaborate, Extend)
- Ask. What other kinds of models might be similar to the water cycle model
Activity Glacier Climbing
Materials:
- plastic shoe box, 1 - 16ounce box of cornstarch, 1-2 cups of water, 1 - 2quart mixing bowl, 5 wooden toothpicks, 5-6 large pebbles, 1 - 5x7 index card, pencil
Focus questions:
- What is a glacier?
- How do they move?
- How can we make a model of a glacier?
Learning outcomes:
- Make a glacier model and explain how it is similar and different to a glacier.
Suggested procedures overview:
- Put students in groups, focus their attention, and assess their initial understanding of the focus questions.
- Review directions, make a glacier, observe how it interacts with different materials.
- Discuss how the model is similar and different to a glacier.
Exploration (Explore, Focus, Engage, Categorize)
- Ask. What kind of effects do glaciers have on landforms?
- Make predictions about what will happen.
- Give the following directions:
- Mix the cornstarch and water together in the bowl
- Form a mixture with the consistency of toothpaste (should not be runny or wet).
- Lay the pencil flat on the table and place one end of shoe box on top of it, this will give the box a slight tilt.
- Pour the corn starch mixture into the box at the raised end and observe what happens.
- After the mixture flows through the entire box, scrape it up with your hand and pile it in the raised end of the shoe box.
- Use the index cards to make a dam across the shoe box valley to hold the mixture back.
- Lay the five toothpicks across the front of the mixture so they are 1 inch apart and parallel to each other.
- Remove the dam and observe the way the tooth picks move as the glacier flows.
- Track the flow of the glacier by writing observations on paper.
- Repeat steps 5 through 9. Only this time add the pebbles at the bottom of the shoe box to make obstructions in the valley.
- Organize groups according to the amount of materials available.
- Have them do the experiment, observe what happens, and then come back together as a class.
Invention (Invent, Construct, Negotiate, Explain)
- Ask. What happens when glacier interacts with obstructions?
- Is there a difference between the toothpicks and pebbles?
- How does the box glacier compare to a real glacier?
- Is this a model?
- Why or why not?
- How might scientists use the same idea?
- Discuss where in the world this is happening today.
- Where in the world did this happen historically?
Discovery (Translate, Elaborate, Extend)
- Ask. How else might this kind of model be used?
Activity Hum Dingers
Materials:
Hum dinger - It is up to you to define what a hum dinger does. What a hum and ding should be. Depending on what you have available to make a device that does two things.
- For each group of four students: 1 construction board or base, 1 D-cell, 1 motor, 4 short sticks, 4 medium sticks, 4 long sticks, 4 hubs, wooden, 10 rubber bands, #16, 4 binder clips, small, 4 paper clips, jumbo, 1 bell, 2 clothespins
- For the class: One demonstration hum dinger, 2 rolls of masking tape, 1 ball of string, wire, no. 22, insulated, paper clips, scissors, pair of pliers, large plastic zip bags, 1 large shopping bag
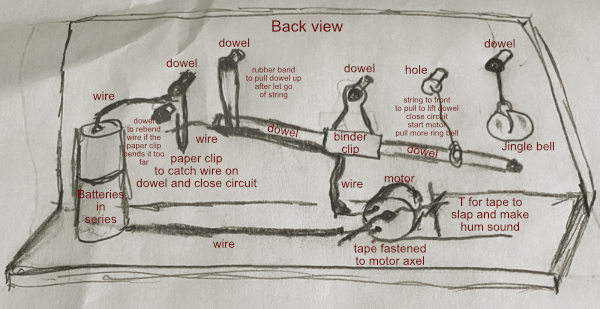
Focus questions:
- How can you make a hum dinger?
Learning outcomes:
- Observe a model of a fanciful device called a hum dinger.
- Organize and assemble components to make a hum dinger.
- Compare what they used as a plan and instructions for their hum dinger to a model.
Suggested procedures overview:
- Put students in groups, focus their attention with a hum dinger, and assess their initial understanding of the focus questions.
Exploration (Explore, Focus, Engage, Categorize)
- Display a hum dinger for the learners to observe.
- Do not show them how it works.
- Ask. DO you know what a hum dinger is.
- Operate the hum dinger.
- Challenge them to make a model or a hum dinger of their own from their observations.
- Tell them that they are making a model of the hum dinger. That is they do not need to make it exactly the way yours is made. All they need to do is make it work the way that yours did. Explain the ground rules. Tell them that they are working in collaborative groups of four and that all-additional materials will be at the materials station. Form collaborative groups. Distribute materials. Watch the students work. Provide engineering hints if needed.
- Call them together to test the hum dingers.
- Show them the demonstration hum dinger.
- How does your model compare to the real hum dinger? Emphasize that different models can provide the same results.
- How does this compare to other models that we have worked with?
- How did you use observations to make your model?
- How does that compare to how scientists use models?
- What did you learn about how to make things?
- How would you describe your model to another person (orally, in writing, with a diagram, take a picture)?
- If you enjoyed making your model, is this something that you would do at home or as an occupation?
- Clean up.
Invention (Invent, Construct, Negotiate, Explain)
- Did you use a model? If they say they didn't, because they didn't write or draw anything, then ask. Did you figured it out in their mind?
- Is that a conceptual model?
- Why or why not?
- How might scientists use the same idea?
- Discuss where in the world this is happening today.
- Where in the world did this happen historically?
Discovery (Translate, Elaborate, Extend)
- Ask.
Activity Drought Stopper
Materials:
- Siphon system, see directions below.
- 2 - one liter cups,
Directions
The drought stopper is a siphon system. It can be constructed with a one liter, opaque, plastic cup, plastic tubing, and waterproof calk. Make a loop with the tubing so one end is touching the bottom of the cup, loops up to about 2/3 - 3/4 of the way up in the cup, and the other end passes through the bottom of the cup. Use the caulk to hold both ends of the tubing in place.
Tube curled in cup:
Tube extended through bottom and sealed with bath caulk: 
Focus questions:
- How can you make more water?
Learning outcomes:
- Construct concrete models to compare to conceptual models.
- Communicate models through discussion and drawing.
Suggested procedures overview:
- Put students in groups, focus their attention, and assess their initial understanding of the focus questions.
Exploration (Explore, Focus, Engage, Categorize)
- Out of sight of the learners, set up the drought stopper (siphon system). Set the siphon system on the edge of a table so the tubing from the bottom hangs over the edge. Fill the other cup with water. Prime the system by pouring enough water into it so the water is to just below the top curve of the loop of tubing. Save the left over water in the cup to pour when you demonstrate the system.
- Ask. Do you think it is possible to create water?
- That is what I am going to do.
- Demonstrate the drought stopper. (Don't let the learners look inside the drought stopper.)
- Tell. Draw what you think is inside the drought stopper.
- Can demonstrate again by running more water through the system so that they can gain additional information to model or build their own drought stopper. (Do not allow them to move the system.)
- Introduce models.
Invention (Invent, Construct, Negotiate, Explain)
- Discuss and interpret student models.
- Work towards a consensus in conference groups.
- Draw a consensus models.
- Discuss the final models.
- How would you describe your model to another person (orally, in writing, with a diagram, take a picture)?
- How did you use observations to make your model?
- How does that compare to how scientists use models?
- What did you learn about how to make things?
Discovery (Translate, Elaborate, Extend)
Activity Fog Chamber
Materials:
- 1- two liter plastic bottle with lid, matches, warm - hot water
- See also Earth science atmosphere
Focus questions:
- How is fog and clouds made?
Learning outcomes:
- Communicate models through discussion and drawing.
- Construct concrete models to compare to conceptual models.
Suggested procedures overview:
- Put students in groups, focus their attention, and assess their initial understanding of the focus questions.
- Demonstrate the cloud machine and discuss how a cloud is made.
- Describe how the cloud in the model is like clouds and fog.
Exploration (Explore, Focus, Engage, Categorize)
- Do you believe in magic?
- Well, I have a demonstration that will make you a believer.
- Show plastic bottle with a splash of warm-hot water on the bottom.
- Drop a lit match into the jar. (optional?)
- Replace the lid and squeeze the plastic bottle.
- You should see a cloud or fog form inside.
- Squeeze again and see what happens.
- If you have a bottle keeper or pump you might want to see how pressure affects clouds.
- If the bottle gets foggy shake the bottle to clear the fog.
- If you can’t see a cloud you may want to use a flash light.
- Try all these again with the bottle one-fourth filled with water.
- Ask. What’s going on?
Invention (Invent, Construct, Negotiate, Explain)
- How do you explain it?
- Review what models are.
- Make hypotheses.
- Give hints.
- Do demonstration again so learners can observe the fog chamber again.
- Discuss hypotheses.
- Have learners conference in small groups and decide what hypothesis best describes this model.
- Discuss final consensus for what the model represents. (This model represents how clouds form.)
- How does this compare to the other models that we have looked at?
Discovery (Translate, Elaborate, Extend)
- Ask. Can you see yourself working with models at home or as an occupation?
Activity Go-Carts
Materials:
- For each team of two students:
1 bag of construction materials, 2 short sticks, 2 medium sticks, 2 long sticks, 4 hubs, wood, 10 rubber , bands, #16, 2 binder clips, small, 2 brass fasteners, 1 in, 4 paper clips, jumbo, 2 clothespins, 1 construction board and base, 1 meter tape, 1 thick book, 1 pair of scissors, 1 student sheet called Go-, Cart Parts Inventory, 1 student sheet called Wheel Patterns
For the class:
1 rubber-band power demonstration, 2 rolls of masking tape, wire, no.22, insulated, string, cardboard, 1 pair of pliers, 1 pair of scissors, large, 1 duplication master for Go-Cart Parts Inventory, 1 Duplication master for Wheel Patterns
Focus questions:
- How can you make a rolling cart?
- What is a design process?
Learning outcomes:
- Construct rolling carts from familiar materials.
- Use a design process to solve specific problems.
- Use eye/hand coordination and spatial relationships to design carts that perform predetermined functions.
- Relate structures to functions.
Suggested procedures overview:
- Put students in groups, focus their attention, and assess their initial understanding of the focus questions.
- Introduce design process.
- Ask if want to design a cart.
- Implement the design process to create a cart.
Exploration (Explore, Focus, Engage, Categorize)
- Ask. How do you make a rolling cart?
- What challenges would you want for the cart? (fastest, drive straight, go the farthest…).
- Review or introduce a design process.
- Decide on construction materials.
- Clarify the task for carts to perform.
- Form teams
- Distribute materials and start
- Assist, only as necessary for teams to achieve success.
- Continue process till all teams wrap up production.
- Have each team present and communicate their cart solution.
- Review design process.
- Have groups perform the task with their cart.
Invention (Invent, Construct, Negotiate, Explain)
- Discuss how each cart performed the task with respects to the design solution of the cart. For example (size of the wheel and axle or other design function).
- Discuss the variables that affected the way the cart moved (friction, speed, wheels, etc.)
Discovery (Translate, Elaborate, Extend)
- Create other problems.
- Discuss how the cart is related to a race car and if pit crew members would have to think about the same variables students came up with.
- How could you change your model to improve your car’s speed?
Activity Cart Tricks
Materials:
- For each team of two students:
1 bag of construction materials, 2 short sticks, 2 medium sticks, 2 long sticks. 4 hubs, wood, 10 rubber bands, #16, 2 binder clips, small, 2 brass fasteners, 1 in, 4 paper clips, jumbo, 2 clothespins, 1 meter tape, 1 pair of scissors, 1 student sheet called Go-Cart Parts Inventory, 1 student sheet called Wheel Patterns, 1 Student sheet called Oval Patterns - For the class:
2 rolls of masking tape, Wire, no.22, insulated, String, Cardboard , 1 pair of scissors, large, 1 duplication master for Go-Cart Parts Inventory, 1 Duplication master for Wheel Patterns, 1 Duplication master for Oval Patterns
Focus questions:
- How can you modify a cart to perform a challenge?
- Would you use a design process to solve a challenge?
Learning outcomes:
- Modify self-propelled carts to perform specific tricks.
- Relate cart design to cart performance.
- Gain experience with design and engineering tasks.
- Investigate the relationships among variables that result in various cart tricks: wheel size, position, and orientation.
Suggested procedures overview:
- Put students in groups, focus their attention, and assess their initial understanding of the focus questions.
- Design and create a cart to travel a specific selected paths.
Exploration (Explore, Focus, Engage, Categorize)
- Review carts from previous activity and discuss possible changes.
- Ask. What challenge would you propose
- Decide on a new challenge(s).
- State the challenge(s).
- Decide on materials.
- Form teams.
- Distribute materials and start the activity.
- Write out the plans.
- Start building the trick carts.
- Test and prepare for runs.
- Conduct runs.
Invention (Invent, Construct, Negotiate, Explain)
- Share cart and explain its performance.
- Have teams explain product development, a problem they had, and how they solved or didn’t solve it.
- Questions to ask: How did you alter your car to make it do the different tricks. What other ways could you have altered your car?
- Discuss the variables that affected the way the cart moved (friction, speed, wheels, etc.)
- Ask. If you were to write a design process to recommend to others, what would it be? How many steps? Add some? or Eliminate some?
Discovery (Translate, Elaborate, Extend)
- Create other problems.
- Discuss how the cart is related to a race car and if pit crew members would have to think about the same variables students came up with.
- How could you change your model to improve your car’s speed?
- Boats?
- Air powered cars?
- Solar cars?
- Spring powered? rubber band?
- Rollers or creepers?
Activity Electric Circuits
Materials:
- 2 D cells, 3 flashlight bulbs and holders, 7 pieces of wire, 15-25 cm, 2 pieces of wire, 30-40 cm
Focus questions:
- What are models for electric circuits?
Learning outcomes:
- Build and observe series and parallel circuits.
- Create a schematic drawing to represent the circuits.
- Compare schematic drawings to models.
Suggested procedures overview:
- Put students in groups, focus their attention, and assess their initial understanding of the focus questions.
- Review a closed circuit.
- Make circuits with multiple bulbs.
- Devise a way to model the circuit,
- Share.
Exploration (Explore, Focus, Engage, Categorize)
- Ask. What is an electrical circuit?
- Share all ideas.
- Show what materials are available for circuit building.
- Decide how to distribute the materials to each group.
- Let them explore materials and build a circuit.
- May need to review conditions to light the bulb.
- Ask. What changes could be made to get the same results?
- Have them draw a schematic and explain how the electricity flows through the circuit and electricity is transferred in the light bulb to light.
- Ask. What is a model?
- If they don’t explain that their diagrams are models, point that out.
- Ask. Could you use the model to predict how they would need to wire a circuit so that it would transfer electricity to two bulbs?
- Have them try their ideas.
- If no one has drawn a circuit with bulbs in series and parallel, you may want to introduce a diagram of each, or wait till later.
- Have groups build their circuits and others drawn.
- Ask. Explain the flow of electricity and predict its flow using their models what will happen when one of the bulbs is removed. Have them remove a bulb and record the results.
- If they have not built both parallel and series circuits, have them do so and use their models to predict what will happen when a bulb is removed. Have them test their predictions and record results.
- Compare the brightness of the bulbs in the two circuits. Record observations.
Invention (Invent, Construct, Negotiate, Explain)
- Have all groups share their results and create a class model to explain all circuits.
- Use the models to explain their observations by the different ways energy transfers from batteries (sources) to light bulbs (receivers).
Discovery (Translate, Elaborate, Extend)
- Ask. How would you use models in real life?
- Ask. How they can use the information they learned about electric circuits?
Activity Moon Crater Models
Materials:
- one pan; “lunar” surface material (potting soil), dry tempera paint, balance, 3 impactors (baseball, golf ball, gum ball), meter stick, ruler, protractor, data chart for each impactor.
Focus questions:
- How can you experience outer space activity? Vocabulary:
Learning outcomes:
- Measure and record the effects of a crater.
- Collect data for three different forms of impactors.
- Interpret and compare data.
- Discuss explanations for the results.
- Create an impact model.
- Become familiar with Impactors-objects of mass Lunar- relating to the moon Crater- depression formed by the impact of an object Ejecta- ray
Suggested procedures overview:
- Put students in groups, focus their attention, and assess their initial understanding of the focus questions.
- Create a model of impact craters and describe how different shapes might be made.
- Compare the craters made with the models to the craters on the moon.
Exploration (Explore, Focus, Engage, Categorize)
- Fill a pan with surface material to a depth of about 2.5cm.
- Smooth the surface, and tap the pan to make the materials settle evenly.
- Sprinkle a fine layer of dry tempera paint evenly and completely over the surface.
- What does the lunar surface look like before testing?
- Use the balance to measure the mass of each impactor.
- Record the mass in a data table for this impactor.
- Drop impactor #1 from a height of 30cm on to the prepared surface.
- Measure the diameter and depth of the resulting crater.
- Note the presence of ejecta rays.
- Count the rays, measure and determine the average length of all the rays.
- Record measurements and any other observations you have about the appearance of the crater on the data chart.
- Make three trials and compute the average values.
- Repeat procedure #2 for impactor #1, increasing the drop heights to 60cm, 90cm, and 2 meters.
- Complete data chart for this impactor. Note that the higher the drop height, the faster the impactor hits the surface.
- Next, repeat steps 2 and 3 for two more impactors.
- Use a separate data sheet for each impactor.
Invention (Invent, Construct, Negotiate, Explain)
- Discuss the results
- What do the data reveal about the relationship between crater size and velocity of impactor?
- What do the data reveal about the relationship between ejecta (ray) length and velocity of impactor?
- If the impactor were dropped from 6 meters, would the crater be larger or smaller? Explain your answer.
- Compare the results
- The size of a crater made during an impact depends not only on the mass and velocity of the impactor, but also on the amount of kinetic energy possessed by the impacting object. Kinetic energy, energy in motion, is described as: m-mass (x) v-velocity. During impact, the kinetic energy of an asteroid is transferred to the target surface, breaking up rock and moving the particles around.
- How does the kinetic energy of an impacting object relate to crater diameter?
- Looking at the results in your data tables, which is the most important factor controlling the kinetic energy of a projectile, its diameter, its mass, or its velocity?
- Does this make sense?
- Explain your answer.
Discovery (Translate, Elaborate, Extend)
- Review photos of the lunar surface and impact craters and compare those craters to the ones you made here on Earth.
Lab Notes for activities
Activity Black boxes
Materials: Black boxes
Trace each box and diagram what you think is inside and how it operates.
What did you learn?
Activity Mystery pipe
Materials: Observations of pipe operation
Draw a diagram of the pipe, what you think is inside, and explain how it operates.
What else did you learn?

Home: Pedagogy - theory, curriculum, learning, human development, & teaching
Home: Science - knowledge base, activities, & pedagogical knowledge