
Magnetism Unit
Last edited - December 16, 2025
Activities, lesson plan, & lab notes (middle grades)
Questioning is the foundation of all learning.
The first step in rejecting not knowing is to ask, why?
Sweetland
Introduction
Oerview
- Introduction
- Big ideas, concepts, facts, & outcomes
- Science content concepts & outcomes
- Inquiry & science process concepts
- Pedagogical overview
- Activities sequence
- Focus question
- Materials
- Scoring guide suggestions
- Unit activity sequence
- Lesson plans
- Activity 1 - Stick to it
- Activity 2 - Magnets, Materials, & Metals
- Activity 3 - Through it all
- Activity 4 - Testing the strength of magnets
- Activity 5 - Iron filings to explore magnetic poles
- Activity 6 - Iron filings to represent a magnetic field
- Activity 7 - Poles and rules of attraction
- Activity 8 - Flexing those Magnet Muscles!
- Activity 9 - Fish and clips
- Activity 10 - Holding power with multiple magnets
- Activity 11 - Floating Magnets
- Activity 12 - Compass
- Activity 13 - The Earth's core is magnetic
- Activity 14 -- Floating magnet in motion
- Lab notes
- Lab note 1 - What attracts to what?
- Lab note 2 - Magnets, Materials, & Metals - Attract or not
- Lab note 3 - Magnets attract through what?
- Lab note 4 - Strenght of magnets
- Lab note 5 - Exploring magnetic fields
- Lab note 6 - Exploring magnetic fields part 2
- Lab note 7 - Poles and rules of attraction
- Lab note 8 - Magnetic strength
- Lab note 9 - Fishing clips
- Lab note 10 - Multiple magnets power
- Lab note 11 - Floating magnets
- Lab note 12 - Compass
- Lab note 13 - The Earth's core is magnetic
- Lab note 14 - Floating magnet in motion
- Summative review
- Support materials
A plan to review and facilitate deeper understanding of magnets and their properties, knowledge of the Earth's magnetic field, and practical uses of magnets in today's world.
Activities explore magnets and scientific experimentation, different kinds of magnets, what they interact with, what they interact through, view of a magnetic field, strength of different magnets and what happens when theys are combined.
Background resources:
A plan designed for learners who have prior knowledge in cause and effect, use of observations to make inferences, models as explanations for observable and non observable events, and working in groups.
Related study topics:
- Electricity - static electricity
- Electrical circuits - A middle level study of electricity and magnetism. Activities start with a historical static influence. Moving to understand current electricity in a simple closed circuit (bulb, battery, & wire) by creating a model that explains the energy transfer from source to receiver. Continues to circuit tester, multiple sources & receivers in parallel and series, resistance, make a switch, electical puzzles, electro magnetism, & electro scale.
Planning information
Learner background information
A plan designed for learners who have prior knowledge in cause and effect, use of observations to make inferences, models as explanations for observble and non observable events, and working in groups.
Intended learnings & learners thinkings
Content concepts or outcomes
(Source concepts & misconceptions)
Big ideas and specific outcomes:
- We understand our world and make decisions based on our understanding of the physical matter in it, and its properties. Magnetism is one property that is important to understand how it interacts with other matter, and how we can use those interations to make our lives better.
Concepts and facts
- All matter has a magnetic field, which interacts with the magnetic fields of other objects, including the Earth and other space objects.
Outcome
Explain properties of magnetism and how they are important for life on Earth.
Science concepts: physical, earth, life
Big ideas and specific outcomes:
- Magnetism is important and useful in a modern world.
- Every magnet has a magnetic field, which interacts with the magnetic fields of other magnets.
- Other objects, including the Earth and other space objects, have magentic fields.
Concepts and facts
- Magnets interact with each other and materials that have iron, steel, cobalt, or nickel.
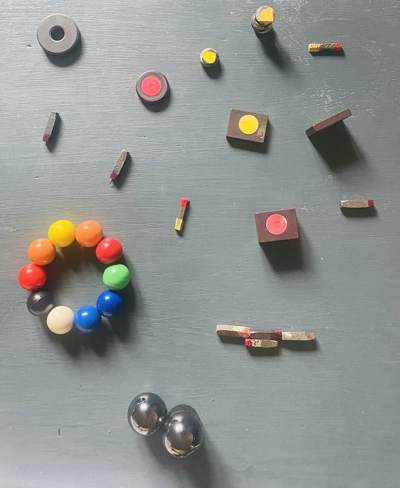
- Magnets do not all look alike and vary in strengths.
- Even if magnets are the same size and shape, they may vary in magnetic strength.
- Magnets strength can decrease over time.
- Magnets have magnetic fields.
- Poles are the strongest points on a magnet.
- All magnets have two poles.
- Opposite poles attract.
- Same poles repel.
- If a compass breaks or a magnet is broken in half, you have two magnets, each with poles.
Outcome
Use and describe magnets interactions with magnets and with iron, steel, cobalt, and nickel. Describe and explain interactions of magnets, magnetic materials, attract, repel, magnetic field, poles, compass, strength of magnetic fields.
- Describe different kinds of magnets.
- Categorize materials as attract to a magnet or not.
- Describe steel and iron attract to magnets.
- Describe magnets attract to other magnets.
- Describe not all metals are attracted to a magnet.
- Describe magnetism will interact through non magnetic objects.
- Describe a magnet has strong points (poles) and weaker points.
- Describe a magnet has a magnetic area (magnetic field) around it.
- Magnetic fields are strongest at the poles, The further away you get from the pole the weaker the filed is.
- Make and explain a rule on how magnetic fields of magnets interact.
- Determine magnets have two poles and they can attract or repel.
- Make and explain a rule on how magnetic fields of magnets interact with the Earth's magnetic field.
Anticipated learner thinkings & misconceptions
- All metals are attracted to a magnet.
- All silver colored items are attracted to a magnet.
- All magnets are made of iron.
- Larger magnets are stronger than smaller magnets.
- The magnetic and geographic poles of the earth are located at the same place.
- The magnetic pole of the earth in the northern hemisphere is a north pole, and the pole in the southern hemisphere is a south pole.
Inquiry, process, & cross cutting concepts & skills
Big ideas: Explanations are created from evidence and tell how different objects interact.. See also Concepts & misconceptions
Magnetic fields can not be observed directly. Therefore, observations of how magnets interact with other magnets or with different materials, (magnetic and non magnetic) is necessary to collect and analyze information to learn about magnetism and explain how it works. Presenting opportunities to understand how science is used to understand and explain the world.
Inquiry
- When I experiment I collect observations that describe how different properties change (become variables) when objects and systems interact. This helps me make claims, explain what is happening, and to predict what might happen in the future.
- Inquiry concepts
- Process concepts
- Perspective concepts
Ccross cutting
Big ideas: See also Concepts & misconceptions
Related concepts and facts
- Observational data and reasoning is used to explain interactions. Evidence is something that
is observed and can be used to understand what is happening and make predictions
about future changes.
- Models are structures that correspond to real objects, events, or classes of
events.
- Explanations are based on observation derived from experience or experimentation and are understandable.
- Pictures or symbols represent objects.
- A symbol represents an energy source and receiver.
- Energy transfer is represented by a continuous path.
- The continuous path must enter and leave both the receiver and source.
- The pattern described or illustrated in the model can be transformed in part and not changed in other parts.
- Essential parts of the system are two terminals on the battery and two terminals on the bulb.
Outcome -
- Use science processes to review and inform their understanding o magnetism.
Specific outcomes -
- Determine relative strengths of different magnets.
- Make and explain a rule on how magnetics interact with other magnets.
- Plan an experiment to explore a question about the strength of magnets.
- Collect data to find the average number of paper clips a magnet can lift.
- Explore the number of paper clips different amounts of magnets will hold.
Other possible concepts
Attitudes
- I can learn about the world around me by asking questions, making careful observations, and trying things.
- I can remember and understand better if I record information by writing, drawing, or using technology to record information.
- I need to be skeptical, because different explanations can be given for the same information and sometimes you can't tell which is better.
- It's fun to share what you know with other people.
- It's okay for people to have different ideas.
- I learn from others when I keep an open mind and listen to others ideas.
- Experiments that do not turn out the way that was predicted can still provide useful information.
- Investigation is an adventure that has been enjoyed by people everywhere and for all time.
History of science and development of technology - perspective of science
See also Concepts & misconceptions also science, math, technology timeline
- People have practiced science and technology for a long time.
- Science develops over time.
- Science investigators such as
Scoring guides suggestions (rubric)
(scoring guide)
Top level
- Explains magnetism is energy which interacts in predictable ways. Magnets have matter that is arranged so their magnetic fields are strong enough to interact with other magnets and materials (iron, nickel, cobalt) whose matter is also arranged to interact with magnetic fields.
- Explains magnetism as I don't know, or as something with magic like qualities: like a magic wand, magic spell, or something else.
Lower level
Strategies to achieve educational learnings
Instructional background resources
- Learning cycle instructional method
- Human development of intellectual thinking - tasks to use with learners across all ages, directions, materials, variety of responses with explanations.
- Learning theory - how humans learn from infant to adult. A constructivist model with a Piagetian base. Includes learning procedure, flow chart, variables that effect learning, what changes & doesn't change, explanations for children's thinking as naive understandings or misconceptions, physical activities that develop intelligence, logic and other thinking skills. Explains development over time:
Instructional Procedure
Pedagogical Overview
Activities Sequence to provide sufficient opportunities for students to achieve the targeted outcomes.
Make sure learners have the prior knowledge identified in the background information.
 Activity 1 starts with a discrepant event. The floating paper clip is similar, but a bit more tricky with an interaction at a distance! Activity 11has floating magnets and could be used with it or before if the opportunity seems right.
- Activity 1 - Stick to it
- Activity 2 - Magnets, Materials, & Metals
- Activity 3 - Through it all
- Activity 4 - Testing the strength of magnets
- Activity 5 - Iron filings to explore magnetic poles
- Activity 6 - Iron filings to represent a magnetic field
- Activity 7 - Poles and rules of attraction
- Activity 8 - Flexing those Magnet Muscles!
- Activity 9 - Fish and clips
- Activity 10 - Holding power with multiple magnets
- Activity 11 - Floating Magnets
- Activity 12 - Compass
- Activity 13 - The Earth's core is magnetic
- Activity 14 -- Floating magnet in motion
- Summative review
Focus question
Unit focus question:
What is magnetism and how can we understand it?
Sub focus questions:
Physical science dimension
- What are magnets?
- What can magnets do?
- What attraction do magnets have?
- What materials attract to magnets?
- Do magnets attract to all metals?
- Will magnetism interact with objects through other objects?
- How strong are different magnets?
- How do magnets interact with other magnets?
- Does size of a magnet effect its energy?
- What do you think will happen if two or more magnets are used to lift objects?
- How many paper clips can a magnet hold (catch - see fish & clips)?
- Does combining magnets increase the strength of attraction?
- Can a magnetic field hold another magnet in thin air?
Science inquiry & process dimensions
- How do you find out more about magnets?
- How do we know something is accurate?
- How do we understand?
- How do you find out more about magnetic forces (magnetic field) beyond a magnet?
Materials
- Floating paper clip materials & suggestions
- Supply of sticky notes in 2 colors, magnets (one per learner). Normal items in a room, Magnets of different sizes and shapes,
- Assorted objects such as paper clips, coins, straws, washers, crayons, pieces of aluminum foil, objects made from varying materials: aluminum, silver, gold, copper, iron nails, plastic, glass, stone, and cloth, etc.
- For each group: Magnets, paper clips, wooden ruler, cardboard, fabric, tin foil, wax paper, oak tag, clear plastic cup, tin can, shoe, plastic block, glass jar, Paper plate, magnets, paper clip, baby food jar, wooden piece, pieces of cloth, piece of aluminum foil, magnetic can top without sharp edges, and container of water
- Plastic bottle with iron shavings (per group), variety of magnets (large bar magnets, if possible),
- Paper, pencil, pen, lab notes.
- Small bar magnets with red and blue dots on their poles so red and blue attract and red - and blue - blue repel OR red and blue sticky dots (businesses use to color code files) or red and blue paint for students to color poles.
- Handful of paper clips for each learner,
- 2 brown lunch-size-bags (pools), 25 big paper clips (big fish), 35 little paper clips (little fish), 15 string (tied to any type of magnet - HOWEVER all ever all should be the same if going to compare catches with different poles), attached to dowel or non-sharp pencils (fishing pole)
- For each group: 3 ceramic ring magnets, 1 large paper clip, with larger end bent into a hook, 70 paper clips, balance scale and gram masses.
- Lab note 1 - What attracts to what?
- Lab note 2 - Magnets, Materials, & Metals - Attract or not
- Lab note 3 - Magnets attract through what?
- Lab note 4 - Strenght of magnets
- Lab note 5 - Exploring magnetic fields
- Activity 5b - Exploring magnetic fields with a compass
- Lab note 6 - Exploring magnetic fields part 2
- Lab note 7 - Poles and rules of attraction
- Lab note 8 - Magnetic strength
- Lab note 9 - Fishing clips
- Lab note 10 - Multiple magnets power
- Lab note 11 - Floating magnets
- Lab note 12 - Compass
- Lab note 13 - The Earth's core is magnetic
- Lab note 14 - Floating magnet in motion
- Summative review
Resources
Lesson Plans
Activity 1 - Stick to it
Materials:
- Supply of sticky notes in 2 colors, magnets (one per student). Normal items in a room.
Focus questions:
- What materials attract to magnets?
Learning outcomes:
- Categorize materials as attract to a magnet or not.
- Describe steel and iron attract to magnets.
- Describe magnets attract to other magnets.
Suggested procedures overview:
- Put students in groups, focus their attention, and assess their initial understanding of the focus questions.
- Categorize and describe materials that attract to a magnet or not.
Exploration (Explore, Focus, Engage, Categorize)
- Demonstrate magnetism by hiding a magnet in your pocket, then casually bringing a metal object (scissors) to the outside of the pocket.
- Remove you hand and let the scissors remain stuck.
- Have the learners discuss what happened.
- Ask. What do we already know about magnets?
- As they offer responses, record them on a chart. Do not correct the their inaccurate responses. This will be helpful in ascertaining their prior knowledge, including accurate and inaccurate assumptions. This chart can be referred throughout the unit of study as a way for them to reflect upon their learning and to rethink inaccurate ideas.
- Might mention magnets in toys they are familiar with. Other examples, magnets hold the refrigerator door shut tightly. Can openers use magnets to hold can lids. Some notebooks, diaries, and other books use magnets to stay closed. Magnets are used in motors and in electric generators. And some people have sunglasses that attach to their glasses by magnets. Also living in Nebraska cows, that range, have magnets in their stomachs, to catch any metal debris before it gets in their digestive system.
- Distribute magnets, so they can test items from their desk and around the room.
- Ask. How could you record data? Chart, Journal,
- What kind of information will be collected? Whether the material is attracted to the magnet or not.
- How could we organize this information? In a table.
- Have them label the objects by making a class table or list. Object - Material - Attract - doesn't attract
- Invite them to test objects and record their results.
- Write the name of each object, test each object, and record the results.
- When all groups are finished, gather all students together.
- Record the information so all can see.
Invention (Invent, Construct, Negotiate, Explain)
- Using the information collected from this experiment.
- Ask. What can they conclude about the kinds of objects that will stick (interact) to a magnet? Do all metal objects stick to a magnet? Shiny objects? Many will predict that anything made of metal will stick to the magnet, DON'T correct this now. More information from the next activity will help refine their understanding.
- Discuss their ideas and compile and display a list of the characteristics of things that stick to magnets.
- Ask. How did the table or list help them organize the observational evidence so they could look for a pattern?
- Where else could they use a that idea?
- How do we know our ideas are accurate or right?
- To what types of materials do magnets attract? If the student say metal, that is okay for now. Next activity will refine to iron, steel, cobalt, by eliminating other metals.
- Ask. How are these objects alike or different.
- When you hold a magnet near a magnetic object, what happens to the magnet?
- What happens to the object?
Discovery- (Translate, Elaborate, Extend)
- Next activity explore more materials that are not normally laying around a classroom.
Activity 2 - Magnets, Materials, & Metals
Materials:
- Paper plates (one for each pair of learners), magnets (one for each learner), objects made from varying materials: aluminum, silver, gold, copper, iron nails, plastic, glass, stone, and cloth, etc. If possible one object of each material for each group. If not, discuss how to pass items around. For example I wore a class ring that could be said was gold and brought a silver spoon. Passed the spoon around and walked around the room and let each group test the ring.
Focus questions:
- What do magnets attract to?
- Do they attract to all metals?
Learning outcomes:
- Describe not all metals are attracted to a magnet.
Suggested procedures overview:
- Put students in groups, focus their attention, and assess their initial understanding of the focus questions.
- Use an operational definition to classify objects as magnetic or nonmagnetic and as attracted to magnets or not.
Exploration (Explore, Focus, Engage, Categorize)
- Ask. What will happen when they touch the objects on the paper plates with a magnet?
- Listen to all responses.
- Ask. How they could record their data?
- Move to groups.
- Give each group a paper plate with the objects listed above on it.
- Give each person a magnet.
- Let them experiment and record their data.
- Ask. What are your results?
- Have them share their data and chart it so all can see.
Invention (Invent, Construct, Negotiate, Explain)
- Define magnetic and non magnetic.
- Can explain most people know magnets attract iron. Fewer know so do nickel and cobalt. Steel has iron in it so it attracts to magnets. Objects of aluminum, copper and lead do not. Could also discuss different type of magnets and how they are made.
- Ask. How or where could you use what you learned?
Discovery (Translate, Elaborate, Extend)
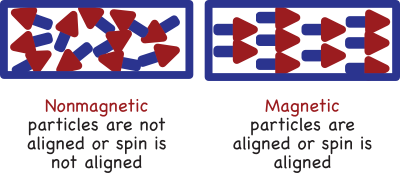
- Ask. If plastic and rubber are not attracted to a magnet, How can there be rubbery magnets? The rubber or plastic is embedded with tiny pieces of magnetized iron and arranged magnetically.
- How can iron be magnetized? Arrange the particles in the same order or get their electrons spinning in the same direction.
- Could a piece of iron or steel, (nail needle), be magnetized by stroking it with a magnet to arrange the particles or their spin? Yes - no
- Explore and find out.
Activity 3 - Through it all
Materials:
- For each group: Magnet, ruler, tape, paper clip, book, catalog, or other books with numbered pages.
- Discovery materials - For each group: Magnets, paper clips, wooden ruler, cardboard, fabric, tin foil, wax paper, oak tag, clear plastic cup, tin can, shoe, plastic block, glass jar, Paper plate, magnets, paper clip, baby food jar, wooden piece, pieces of cloth, piece of aluminum foil, magnetic can top without sharp edges, and container of water
Focus questions:
- Will magnetism interact with objects through other objects?
Learning outcomes:
- Describe magnetism will interact through non magnetic objects.
Suggested procedures overview:
- Put students in groups, focus their attention, and assess their initial understanding of the focus questions.
- Test different objects to see if magnetism will interact with another object through different materials.
Exploration (Explore, Focus, Engage, Categorize)
- Ask. Will a magnet attract through other materials?
- Paper?
- How many pages do you think a magnet will interact with a paper clip?
- How can we find out?
- Create a procedure.
- Open each catalog to page one.
- Place the magnet, on top of a ruler, on the left hand page, turn one page, and place the clip on top of the magnet, so that by moving the ruler the magnet will or will not move the clip.
- Continue to turn pages and move the clip until the clip will no longer move with the magnet.
- Count pages or note page number and divide by two (because each page has two sides). Record the number.
- Share observations with the whole class.
Invention (Invent, Construct, Negotiate, Explain)
- Have learners discuss the affecting variables (magnets, clips, style of pages, and strategies used).
- Ask. Will a magnet attract through other materials?
- How can we find out?
Discovery (Translate, Elaborate, Extend)
- Ask. What will happen if objects are placed between a magnet and a metal paper clip.
- Share ideas.
- Ask. How could they explore their ideas?
- Discuss and decide on a procedure.
- Conduct their investigation and record their data.
- Hand out supplies to each group of 3-4 students
- Let the them experiment and record their data.
- Have the groups share their ideas.
- Ask them to explain their results. Have groups exchange magnets, materials, or test strategies and record results.
- Have them write in their journals two sets: those through which the magnet could attract the clip, and those through which it could not.
- Have them write an explanation about their results, why certain materials allowed an interaction (attraction).
- Have the them share and discuss their results with the whole class.
- Ask. What do you think might be different inside a material or object that is magnetic and one that is n0t magnetic? Accept all responses.
- Ask. What do you think would happen if a magnet were broken in half? Accept all answers.
- Break a magnet or show one that is broken. I would explain that I have one that I broke a few years ago and reuse to explore magnets.
- Let them explore and observe that the magnet pieces still have magnetism. The might bring up the idea of it not being as strong and you can suggest that they will explore magnets strength later.
- Say. That it a magnet can be broken and still be magnetic that might suggest there are something small inside that makes it magnetic. Could call them particles, atoms, electrons what ever they are comfortable with.
- Ask if they would make a model, what might it look like?
- Return to the idea of strength.
- Ask. How could you design an experiment to find a magnet’s strength?
- Have them design and go to activity 4 where they can perform their experiment or use the example.
Activity 4 - Testing the strength of magnets
Materials:
- Magnets (one of varying strength for each pair of students), handful of paper clips (for each pair of learners)
Focus questions:
- How strong are different magnets?
Learning outcomes:
- Determine relative strengths of different magnets.
Suggested procedures overview:
- Put students in groups, focus their attention, and assess their initial understanding of the focus questions.
- Determine relative strengths of different magnets.
Exploration (Explore, Focus, Engage, Categorize
- Put learners into pairs and let them explore the strength of a magnet with paper clips.
- Ask them to record what they discover.
Invention (Invent, Construct, Negotiate, Explain)
- Bring the class together and share their ideas.
- Ask. How close can a paper clip be slid toward a magnet before the magnet pulls the paper clip to it? Answers var
- What did yoiu discover as it was slid toward the magnet? The closer the paper clip gets to the magnet the stronger the magnetic field. If they mention poles, that is fine, if not it will be explored later.
- Ask how an we measure the strength of a magnet. Accept all appropriate ideas.
- Decide on a group procedure to measure the strength of a magnet or a collection of them.
- For example.
- Demonstrate to the learners. How to attract one paper clip to a magnet, then take a second and bring it close to the first so they will link together magnetically to the magnet.
- Ask. How many paper clips do you think the magnet will be able to lift that are linked magnetically in a chain?
- The pairs can predict the total number of paper clips they could link to a magnet.
- Suggest each group can use a magnet and find how long a magnetic chain their magnet can support to test the strength of the magnet.
- Agree on a procedure and how to record their data.
- Let them explore and record their data.
- Have them share their data and record it so all can view it.
Discovery (Translate, Elaborate, Extend)
- Ask. What do the results mean?
- What does it tell about magnets? magnets have different strengths. Sometimes a bigger magnet isn't stronger.
- Ask. Are there other ways you can test the strength of the magnetic fields of magnets?
Activity 5 - Iron filings to explore magnetic poles
Materials:
- Plastic bottle with iron shavings (per group), variety of magnets (bar magnets, round, donut), paper, pencil, pen, lab notes.
- Optional compass. To explore the magnetic fields. Note: The direction of a compass can be changed with strong magnets. If learners are going to compare their findings, you may need to check to see if the ends of their compass are the same. The directionality of their pointing, See activity 7 for more information.
- Activity 5b - Exploring magnetic fields with a compass
Focus questions:
- How do you find out more about magnets?
Learning outcomes:
- Describe a magnet has strong points (poles) and weaker points.
- Identify magnetic poles for different shapes of magnets.
- Where are the poles on a circular magnet with a hole in the middle?
- Use a compass to explore the magnetic field around the poles of different magnets.
Suggested procedures overview:
- Put students in groups, focus their attention, and assess their initial understanding of the focus questions.
- Explore different shapes of magnets with iron filing in a bottle to discover poles.
- Describe magnetic fields and poles on the different magnets, bar, circular, and donut magnet with a hole in the middle.
Exploration (Explore, Focus, Engage, Categorize)
- What will happen when the bottle of iron filings are brought close to a magnet?
- Tell. Do NOT open the bottles.
- Observe what happens and record/draw on paper (observe a pattern of iron filings that are interacting with a magnetic field. Or a model of a magnetic field)
- Tap the bottle lightly with your finger.
- Try different magnets in different positions.
- Shake or move the bottle to distribute the iron filings for better observations.
- Observe what happens and record and draw the location of the iron filings relative to each magnet.
- Could also move a compass around the magnets to explore the fields. Could draw a map of the area around the magnet with arrows showing the directions the compass points.
- Let the group explore and record their findings.
- Share finding and let them draw their magnets interaction with the iron filings so all can see.
Invention (Invent, Construct, Negotiate, Explain)
- Bring the class together.
- Discuss what is observed.
- What evidence do you have that suggest the magnet is interacting with the iron filings? they move, are held against the bottle, supported instead of falling or sliding down.
- Does the magnet interact at a distance? yes
- Is the magnet really holding it? kinda not It is the magnetic energy
- What really is interacting with the iron filings? magnetic field, but need both the magnet and the iron filings to see an interaction.
- This discussion will lead to the idea of a magnetic field.
NEXT
- Did you observe where the most iron filings are being attracted to the magnet?
- Refer to their drawings.
- Have them mark where there is more filings.
- Should notice there are two areas on each magnet.
- Invent poles and that all the magnets they explored have two poles
- Tell them scientist call these areas the poles of the magnet.
- Where? Depends on the magnet. Bar magnets at the ends. Horse shoe magnets at the end of the shoe. Ring magnets (look like a donut) in the hole. Round magnets in the center.
- Draw magnet shapes and mark the points where they are strongest.
- Ask. Why they think there are two stronger areas?
Discovery (Translate, Elaborate, Extend)
- What else might we do to study magnetism?
- Where is the poles on a circular magnet with a hole in the middle?
- Use a compass to explore the magnetic filed around the poles of different magnets.
- What other ways can we use evidence to explain events?
- Ask. How can we explore magnetism beyond a magnet?
Activity 6 - Iron filings to represent a magnetic field
Materials:
- Iron shavings (per group), Several kinds of magnets (bar magnets, horse shoe, ring, ... ), oak tag, paper, pencil pen, paper plate and plastic wrap.
Suggestion. Instead of pouring iron filings on a paper with a magnet below. A Styrofoam plate can be used. Pour iron filings on the Styrofoam plate and seal it with plastic wrap and tape.
Focus questions:
- How do you find out more about magnetic forces (magnetic field) beyond a magnet?
- How does the distribution of the iron filings effect your model of magnetism?
Learning outcomes:
- Describe a magnet has a magnetic area (magnetic field) around it.
Suggested procedures overview:
- Put students in groups, focus their attention, and assess their initial understanding of the focus questions.
- Explore magnetic fields beyond a magnet to suggest a field extends well beyond its surface.
- Draw and describe models of magnetic fields.
Exploration (Explore, Focus, Engage, Categorize)
- Ask. How can we explore the magnetic field beyond the surface of the magnet?
- If learners don't suggest iron filings .... hint ...
- We can use the metal filings. Either - demonstrate how to put a magnet under a piece of oak tag, pour the iron filings on top. Have a tray to collect the filings so they can be returned to the original container when done. OR demonstrate how to place a magnet under the Styrofoam iron filings container.
- Ask. Are there any questions/
- How can we record their data?
- Collect data for different magnets.
- Share data on board so all can see.
Invention (Invent, Construct, Negotiate, Explain)
- Bring the class together.
- Ask. What does this suggest? magnetism extends beyond the surface of a magnet. It seems to travel from one pole of the magnet to the other.
Discovery (Translate, Elaborate, Extend)
- Ask. What would happen if
Activity 7 - Poles and rules of attraction
Materials:
- Small bar magnets, Assorted objects such as paper clips, coins, straws, washers, crayons, pieces of aluminum foil
- magnets with red and blue dots on their poles so red and blue attract and red - and blue - blue repel OR red and blue sticky dots (businesses use to color code files) or red and blue paint for students to color poles.
Focus questions:
- How do magnets interact with other magnets?
Learning outcomes:
- Make and explain a rule (operational definition) on how magnetics interact with other magnets.
Suggested procedures overview:
- Put students in groups, focus their attention, and assess their initial understanding of the focus questions.
- Discuss combinations.
- Explore combinations of placing two magnets with two end together.
- Explore magnets interactions and record the possible outcomes.
- Create an operational definition for how magnets interact.
Exploration (Explore, Focus, Engage, Categorize)
- Most of our explorations have been with magnets and other materials.
- How do magnets interact with other magnets? Attract and repel
- How can we explore and find out? Play with two magnets.
- Give each pair of learners two magnets and let them explore.
- Ask. How do the magnets interact with each other? It pushes away sometimes and attracts sometimes.
- If they have already discovered that magnets attract and repel, then review the vocabulary. Interact or don't interact, attract, move together, repel, move apart.
- How do we figure combinations?
- Do combination mini-lesson
Suggested combination mini-lesson
- Put students in groups, focus their attention, and assess their initial understanding of the focus questions.
- Draw one tile from a sock with three colored tiles.
- Chart & discuss results.
- Identify possible outcomes and the number of possible combinations.
- Draw four times from a sock with three colored tiles.
- Chart & discuss results.
- Identify possible outcomes and the number of possible combinations.
- Identify all possible outcomes and the number of possible combinations.
- Describe both theoretical and experimental probability for the exploration.
TWO WAYS Lesson can go depending if magnetic poles are color coded or not.
Color coded magnets ...
- If color coded, Ask. Did you noticed which colors attracted each other and which colors repelled? Opposite colors attract and the same colors repel.
- Let's take a quick check.
- Take your magnets, check their interactions, and record them in a matrix.
| Red | Blue | |
|---|---|---|
| Red | ||
| Blue |
Magnets not color coded ...
- Let's see if we can find a rule more specific than poles can either attract or repel.
- Let's start with the fact that magnets have two poles.
- With this being true, then how many ways can two poles be placed facing each other? four ways in which two magnets could be put together
- Let's check this by drawing a magnet and color its poles - one blue and the other red.
- Okay. Now if we have two magnets, what are all the combinations for the poles interacting? r-r; r-b; b-r; b-b.
- Now to find out what happens with these different interactions we have to label a couple of magnets so we can keep track of which of the four interactions we are exploring.
- Will need to discuss how to label the magnets after the first one. For example. If we randomly label 20 or whatever number of magnet you have, then Some would attract r-r & b-b and others might attract r-b.
- One possible way is to say ...
- If we put a red dot on one side, then what does that mean?
- If red is one kind of side, end, or pole, then what defines another that is the same?
- A pole that attracts to it or one that repels it? listen to all answers ... then ...
- SAY. Historically Ben Franklin had this problem with electricity (static) and he just picked one (negative). With magnetism people decided that like p0les repel and unlike poles attract.
- Distribute magnets and have them with label the magnets accordingly or if the have magnets already colored, have them explore different combinations of poles or colors coming together.
- After they are labeled, suggest they quickly check to make sure some weren't mistakenly labeled, by filling out the chart.
| Red | Blue | |
|---|---|---|
| Red | ||
| Blue |
Invention (Invent, Construct, Negotiate, Explain)
- Display data so all can view.
- What did we discover? Opposite colors attract(r-b; b-r) and the same colors repel (b-b; r-r).
Discovery (Translate, Elaborate, Extend)
- Ask. What if we had used red and yellow?
- What if we used - positive and negative; or north and south; or north seeking and south seeking poles?
- Pick one and complete the matrix.
| . | . | |
| . | ||
| . |
- Let's do an activity where we pretend to be magnets.
- Say. Pretend you have a purple sticker on your right hand and a pink sticker on your left hand.
- If everyone were standing inside a circle.
- What would be the rule for being able to give fist bumps? bumps l - r; r - l; no bumps r - r; l - l
- Have two demonstrate.
- the rule that if they are facing the same direction you cannot touch each other.
- What happens if three are together?
- Have three demonstrate?
- Are there different ways?
- Four ....
- More ....
- Pattern?
- Summarize how magnetism will or won’t attract.
- What evidence do you have to support your claims?
- How did the matrix help with the observational evidence?
- Where might we use the information we learned?
Activity 8 - Flexing those Magnet Muscles!
Materials:
- Magnets of different sizes and shapes, paper clips or washers,
Focus questions:
- Does size of a magnet effect its energy?
- What do you think will happen if two or more magnets are used to lift objects?
Learning outcomes:
- Plan an experiment to explore a question about the strength of magnets.
Suggested procedures overview:
- Put students in groups, focus their attention, and assess their initial understanding of the focus questions.
- Plan an experiment to explore a question about the strength of magnets.
- Summarize class findings about the strength of magnets related to their shapes and sizes.
Exploration (Explore, Focus, Engage, Categorize)
- Do you think that different sizes and shapes of magnets effect their magnetic energy?
- How can we explore these ideas and come up with a conclusion?
- What hypothesis or question could we test?
- Larger magnets will pick up more. Will larger magnets pick up more?
- Smaller magnets will pick up ...
- The size of a magnet will …
- The shape of a magnet will ...
- The materials used to make the magnet?
- Each group writes a question or hypothesis to explore.
- Example
- Decide how to determine the size of magnets. Use mass?
- Make a pile of paper clips or washers.
- Choose one magnet and place it on the pile.
- Slowly lift it out of the pile and record the number of ... it picks up.
- Repeat steps with the remaining magnets.
- Repile the pile of paper clips and repeat.
- Record results.
- Compare the results by the size of the magnet.
- Share result so all can see.
Invention (Invent, Construct, Negotiate, Explain)
- Discuss the results.
- What can you conclude about the size of a magnet and the force of the magnetic field?
Discovery (Translate, Elaborate, Extend)
- Ask. What do you think will happen if two or more magnets are used to lift objects? Multiple magnets will pick up more than one magnet. See activity 10
Activity 9 - Fish and clips
Materials:
- 2 brown lunch-size-bags (pools), 25 big paper clips (big fish), 35 little paper clips (little fish), 15 string (tied to any type of magnet - HOWEVER all ever all should be the same if going to compare catches with different poles), attached to dowel or non-sharp pencils (fishing pole)
Focus questions:
- How many paper clips can a magnet catch?
Learning outcomes:
- Collect data to find the average number of paper clips a magnet can lift.
Suggested procedures overview:
- Put students in groups, focus their attention, and assess their initial understanding of the focus questions.
- Challenge the learners to create a plan to determine the average number of paper clips a magnet can lift.
Exploration (Explore, Focus, Engage, Categorize)
- Ask. Have you ever gone fishing?
- Describe the process of fishing. List characteristics on the board.
- Show them a big and little paper clip.
- Ask. Will a magnet pick more big or little paper clips?
- Why do you think?
- Ask. Do you want to fish for clips?
- Would you fish for big paper clips or little?
- Well you are going to fish for both.
- Let's make a procedure to use to fish.
- Put 25 paper clips inside a paper bag.
- Dangle the magnet inside the paper bag. (Decide to just drop it and lift or drop, drag, lift or other.)
- Lift up and out of bag. If clips fall outside of bag, they count, inside don't.
- Count clips and record the number beside the trial number.
- Return the clips to the bag.
- Repeat 3 times.
- Then do the same for large clips.
- Then mix large and small and do the same.
- Go fish ...
- Make a table on the board and have each group record their catches according to: Big, Little, and Mixed.
Invention (Invent, Construct, Negotiate, Explain)
- Discuss which catch was more, less, in between.
- How much more, less, ...
- Write a math sentence using the greater than or less than symbols.
- Could find averages.
- Discuss if the differences is significant?
- Ask. What do you think caused a difference?
- Speculate if the mass or weight of the three is different. Can suggest to find the weight or mass of the average for each of the three. small, large, & mixed.
Discovery (Translate, Elaborate, Extend)
- What might happen if the magnets were combined? Activity 10
Activity 10 - Holding power with multiple magnets
Materials:
- For each group: 3 ceramic ring magnets, 1 large paper clip, with larger end bent into a hook, 70 paper clips, balance scale and gram masses.
Focus questions:
- Does combining magnets increase the strength of attraction?
Learning outcomes:
- Explore the number of paper clips different amounts of magnets will hold.
- Make a conclusion about the strength of combined magnets.
Suggested procedures overview:
- Put students in groups, focus their attention, and assess their initial understanding of the focus questions.
- Challenge the learners to create a plan to determine if increasing the number of magnets will increase the number of paper clips lifted.
- Experiment and make a conclusion about the combined strength of magnets.
Exploration (Explore, Focus, Engage, Categorize)
- Show learners a magnet with hook and paper clip.
- Ask. How many paper clips do you think a magnet can lift?
- Would two magnets separately or two magnets together, ith poles alligned, hold more?
- What about three, four, ...
- Ask. How can we see what happens?
- Decide on a procedure to answer the questions?
- Make a set up of a magnet with a paper clip hook. Paper clip bend so it will stick to a magnet (magnetically) and paper clips or washers can be hung onto the clip.
- Hang paper clips on the hook one at a time.
- Continue until the hook falls off the magnet.
- Decide if each group should do multiple trials.
- Count the clips that were on the hook, and write the number of clips in a table.
- Repeat the activity with two magnets ...
- Repeat again with three ...
- Implement the procedure
- Have groups display data in a table so all can view. Number of magnets - number of paper clips.
Invention (Invent, Construct, Negotiate, Explain)
- Ask. What does the data suggest?
- Why did some have more or fewer clips on their magnet? not all magnets have the same strength. Even the same magnet ro group of magnets will pick uo differet amount on different trials.
- Why might the hook hold more with a second magnet unit added?
- Why do you think one 2-unit magnet didn’t hold twice as much as a single magnet. (3 times, 4 times, and so on)
- What does this suggest about magnetism?
Discovery (Translate, Elaborate, Extend)
- Is there a difference if poles are mixed? Depending on the magnets it may be difficult to arrange magnets with mixed poles as they will want to repel rather than attract and stay put. It may be possible to force them together with rubber bands if you want to explore different arrangements.
- If poles are mixed and they pick up less, the how does this support the model for magnetic and nonmagnetic magnets? Aligned poles or spin makes a stronger magnetic field.
Activity 11 - Floating Magnets
Materials:
- Ring magnets (at least three for each group), section of dowel rod (one for each group)
Focus questions:
- Can a magnetic field hold another magnet in thin air?
Learning outcomes:
- Review magnets have two poles and they can attract or repel.
Suggested procedures overview:
- Put students in groups, focus their attention, and assess their initial understanding of the focus questions.
- Float magnets and explain their magnetic fields interacting.
Exploration (Explore, Focus, Engage, Categorize)
- Demonstrate how to set up the experiment (without actually demonstrating the results; this is for the learners to discover):
- Tie the string around the center of one of the bar magnets. Hold the string in the air, so that the magnet dangles below. Have a partner take the other bar magnet and move the North Pole towards the north pole of the dangling magnet.
- What happens?
- Ask. What will happen if the other poles are put together (south - south)?
- What if you put together a south pole and a north pole?
- Show them two ring magnets.
- Ask. What will happen if you put them together? Wait to get all possible combinations. If necessary make a matrix like in activity 7. like repel (NN, SS) unlike attract (NS, SN)
- Ask. How could you keep the like ends from pushing each other and flying apart? What if we use gravity to try to get them in equilibrium?
- What could we do to keep them from flying apart? put them on a dowel rod
- What will happen if they put the two ring magnets on an upright dowel rod? they will attract together or repel and float
- Listen to responses.
- Ask. How they could record their data.
- Give each group the materials.
- Let them experiment with the magnets and record their data.
Invention (Invent, Construct, Negotiate, Explain)
- Ask. What did you find out? Some floated and some stuck.
- What made a difference?
- If you were to put stickers: red and blue on the magnets how would that work with your observations? Need a r-r or b-b to float if have a r-b or b-r they attract and won't float.
- Draw and explain their magnetic fields interacting.
Discovery (Translate, Elaborate, Extend)
- Suggest they combine magnets and stack for or five so they float, draw a picture, to scale noting the distance between them.
- How did the distances change?
- Ask. How can you explain the results? Gravity, weight of the magnets...
- How might floating objects with magnetism be used in the world. Magnetic trains ...
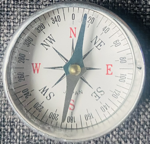
Activity 12 - Compass
Materials:
- Sewing needle, wax paper, magnet, water, small container or tub,
- Smallish bottle cap, bar magnets.
Focus questions:
- How do magnets interact with the Earth?
- How do you make a compass?
Learning outcomes:
- Make a compass, explore how it interacts with the Earth, research and explain the Earth's magnetic field.
Suggested procedures overview:
- Put students in groups, focus their attention, and assess their initial understanding of the focus questions.
- Make a compass, explore how it interacts with the Earth, research and explain the Earth's magnetic field.
Exploration (Explore, Focus, Engage, Categorize)
- Ask. What happens when you use a compass?
- How could you make a compass?
- Procedure -
- Take the needle and stroke it with the pole end of the magnet only in one direction from the eye of the needle to the tip. Repeat the process 50 or more times.
- Color one end with a magic marker.
- Using a pair of scissors, cut a 1″ (2.5 cm) circle in diameter out of the wax paper.
- Carefully push the needle half way through the wax paper circle, as you would a needle into cloth.
- The needle should be positioned half-way through the wax paper with half the needle on one side of the circle and the other on the other half.
- Flatten the surface of the wax paper.
- Fill the large lid, or small container, or tub half full with water.
- Place it on a flat surface that is not near any iron or magnetic material.
- Carefully place the needle that is in the wax paper on the surface of the water.
- Notice how the needle orients itself with the Earth.
- Turn the container and see if the compass needle will reorient itself.
- You can also float a small bottle cap with a bar magnet and see if it will act like a compass.
- If you used a bar magnet that was color coded, what color of magnet is represented with at the north and south magnetic poles?
Invention (Invent, Construct, Negotiate, Explain)
- Ask. What did you find out? Some floated and
Discovery (Translate, Elaborate, Extend)
- Used to be essential for navigation, until invention of cell phone location math, GPS, and satellites.
Activity 13 - The Earth's core is magnetic
Materials
- Journal, magnets, tissue paper, newspaper, starch and paint (optional)
- Lodestone if available.
- Suppport materials -
Focus questions
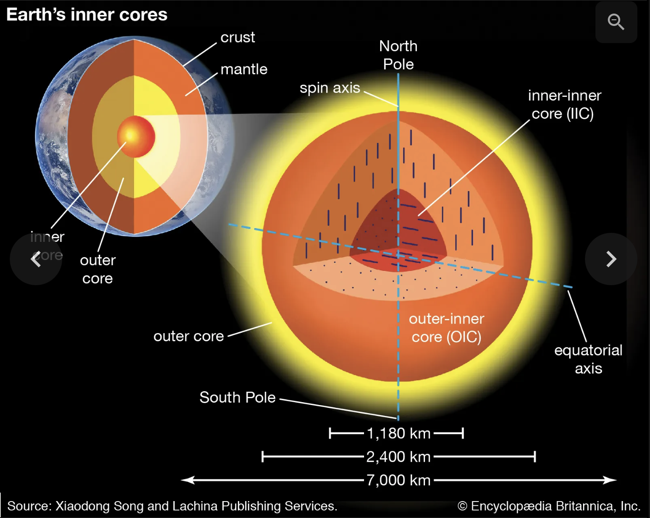
- What are the layers of the Earth?
- What are their properties?
- Are there rocks that are magnetic? Lodestones are rocks which are naturally magnetic.
- How does the core of the Earth generate a magnetic field.
Learning outcomes
- Illustrate the Earth's core and the magnetic field it generates.
Suggested procedures overview:
- Put students in groups, focus their attention, and assess their initial understanding of the focus questions.
- Make a model of the Earth and its magnetic field and how it interacts with a compass.
Exploration (Explore, Focus, Engage, Categorize)
- Tell. With your new knowledge, predict what the poles of this bar magnet are. (Prove a bar magnet with strips of electrical tape covering the ends.)
- Provide time to experiment with the magnets to predict which the North Pole is and which is the South Pole.
- After, they can remove the tape to check their predictions.
- Explain that the Earth's core generates a magnetic field like the bar magnet.
- Hand each child a piece of tissue paper.
- Imagining that the bar magnet represents the core of the Earth;
- Ask. How could you use the tissue paper to create a layer of Earth to cover the core.
- After they have found they could wrap the magnet in the tissue paper, pass out 10 more pieces to continue layering the core.
- Walk around and question each child to find out if they understood the concept of core and layers of the Earth.
- Again reviewing, ask what they know about the top layer of the Earth. 75% of the earth's surface is water, the differing habitat.
- Demonstrate a top layer of the Earth by taking strips of newspaper dipped in starch to cover the tissue layers of the Earth (if time permits, painting the paper-mache Earth once it has dried would make an excellent art project).
- After each child has completed the activity, have them draw an Earth on the back, labeling the core, differing layers and top layer of the Earth.
- Ask.
- Were you surprised the Earth's core is magnetic? Why or why not?
- Have you ever had an experience seeing the different layers of the Earth? Grand canyon ...
- What have you noticed about the top layer of the Earth?
- What conclusions can you draw from this activity?
- Do you have any predictions about tomorrow's lesson which will focus on the Earth's Poles?"
Invention (Invent, Construct, Negotiate, Explain)
- Ask. What did you find out?
- Draw a diagram that represents the Earth, its magnetic field, and your compass.
Discovery (Translate, Elaborate, Extend)
- Review the knowledge of magnetism gained through lessons by asking open-ended questions.
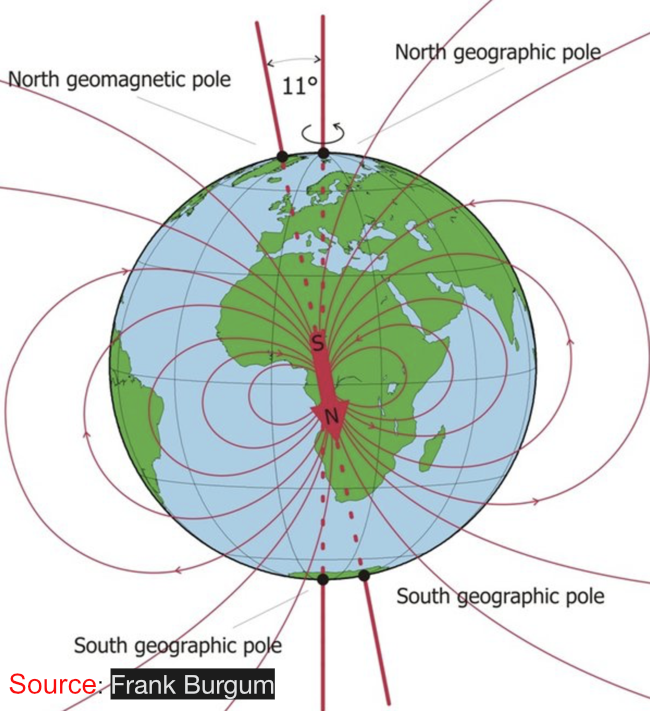
- Ask. Do you know where the North Pole is?
- Allow students time to look at a map or globe to find their answers.
- Tell. There is also a magnetic north pole.
- Ask for predictions of what that might mean.
- Write their predictions on a piece of chart paper.
- Tell them they will find the magnetic north pole by the end of this lesson.
- Have them mark the north pole of the magnet.
- Finding the middle of the magnet, have the learners wind a 7"-8" piece of thread around the magnet and tie into a knot.
- When they hold the other end of the thread, the magnet should be balanced and parallel to the ground.
- Take the free end of the thread and tape it to the end of the ruler.
- Place five books on the edge of a counter, sliding the ruler between the top two books. The magnet will be hanging down and able to move about.
- Once the magnet comes to rest, where does the north pole of the magnet point?
- Move the magnet again to find if it settles in the same spot.
- Move about the room as well as outside.
- Does the pole continually point in the same direction?
- Allow ample time for students to experiment then gather in a group.
- What did the student's experiments find?
- Were their results consistent?
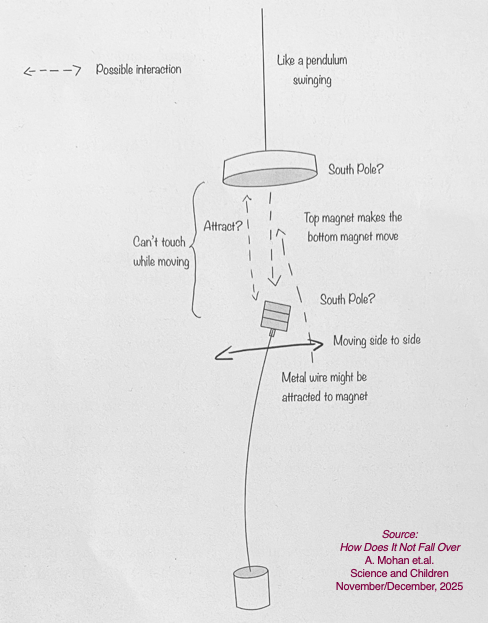
Activity 14 - Floating magnet in motion
Materials
- Lab notes 14 - Floating magnet in motion
- Magnets, thin stiff wires, string or thread, tape
Focus questions
- Can you use your engineering skills and create an interesting interaction with a swinging magnet and another?
Learning outcomes
- Explore and explain how to create an interesting interaction between a swinging magnet and another magnet,
Suggested procedures overview:
- Put students in groups, focus their attention, and assess their initial understanding of the challenge.
- Ask and answer questions until the learners are ready to try the challenge.
Exploration (Explore, Focus, Engage, Categorize)
- Share the image on the Lab notes and ask if they will accept the challenge.
Invention (Invent, Construct, Negotiate, Explain)
- Ask. What did you find out?
- Draw a diagram that represents the two magnets and how they interact when it swings.
- Review the knowledge of magnetism gained through lessons by asking open-ended questions. How do magnets attract? Repel?
- Ask. Do you know where the poles were on these magnets?
- Does it make a difference how the poles were oriented?
- If the wire the magnet is on is stiff enough to support it, what happens if the poles of that magnet are the same or different than the swinging magnet?
Discovery (Translate, Elaborate, Extend)
- Can you create a different version as interesting?
Lab Notes for activities
Lab Notes for activities
Activity 1 - What attracts to what?
Materials:
What did you do?
What did you learn?
What else did you learn?
Activity 2 - Magnets, Materials, & Metals - Attract or not
Materials:
Challenge
What materials do magnets interact with magnetically?
What will you do?
| Object | Material | Attract | Didn't attract |
|---|---|---|---|
What did you learn?
What else did you learn?
Activity 3 - Magnets attract through what?
Materials:
Challenge
What materials do magnets interact through magnetically?
What will you do?
| Object | Material | Attract through | Strength |
|---|---|---|---|
What did you learn?
What else did you learn?
Activity 4 - Strenght of magnets
Materials:
Challenge
How strong are magnets?
Explore the strength of a magnet with a paper clip chain and record what you discover.
What will you do?
| Magnet - shape, material ... | Strength |
|---|---|
What did you learn?
What else did you learn?
Activity 5 - Exploring magnetic fields
Materials:
Iron filings, magnets, compass
Challenge
What might a magnetic field look like?
What will you do?
Draw a representation of a magnetic field.
What did you learn?
What else did you learn?
Activity 5b - Exploring magnetic fields with a compass
Materials:
Magnet, compass
Challenge
Explore a magnetic field with a compass
What will you do?
Place a magnet in the center of the polar coordinate and draw a map showing how the compass interacts with the magnetic field.

How can the map be used to show a representation of the magnetic field? Note the map is a 2-D representation.?
What else did you learn?
Activity 6 - Exploring magnetic fields part two
Materials:
Challenge
What might a magnetic field look like?
What will you do?
Draw a representation of a magnetic field.
What did you learn?
What else did you learn?
Activity 7 - Poles and rules of attraction
Materials:
| Red | Blue | |
|---|---|---|
| Red | ||
| Blue |
Summarize what you learned.
What else did you learn?
Activity 8 - Magnetic strength
Materials
Question:
Procedure
Chart the data

Summarize your data.
Summarize the class data.
Activity 10 - Multiple magnets power
Materials:
What did you do?
What did you learn?
What else did you learn?
Activity 11 - Floating magnets
Materials

Dowel rod, 2 - donut shaped magnets
What did you do?
What did you learn?
What else did you learn when you stacked more magnets?
What else did you learn?
Activity 12 - Compass
Materials
- Sewing needle, wax paper, magnet, water, small container or tub, or bottle cap, stronger magnet.
Possible directions
- Take the needle and stroke it with the pole end of the magnet only in one direction from the eye of the needle to the tip. Repeat the process 50 or more times.
- Color one end with a magic marker.
- Using a pair of scissors, cut a 1″ (2.5 cm) circle in diameter out of the wax paper.
- Carefully push the needle half way through the wax paper circle, as you would a needle into cloth.
- The needle should be positioned half-way through the wax paper with half the needle on one side of the circle and the other on the other half.
- Flatten the surface of the wax paper.
- Fill the large lid, or small container, or tub half full with water.
- Place it on a flat surface that is not near any iron or magnetic material.
- Carefully place the needle that is in the wax paper on the surface of the water.
- Notice how the needle orients itself with the Earth.
- Turn the container and see if the compass needle will reorient itself.
What did you do?
What did you learn?
What else did you learn?
Activity 13 -
Materials
- Journal, magnets, tissue paper, newspaper, starch and paint (optional)
- Lodestone if available.
- Suppport materials -
What did you do?
What did you learn?
Draw a model of the Earth, its magnetic field, and how it interacts with your compass.
What else did you learn?
Activity 14 - Floating magnet in motion
Materials
- Journal, magnets, thin stiff wires, string or thread, tape
Challenge
Use the diagram and create an interesting interaction for the two magnets when the top magnet swings. Make a video that will amaze viewers or make them think it is magic!
What did you do?
What did you learn?
What else did you learn?
Summative review
Magnetism challenges & review
What makes objects magnets?
Draw a diagram as a model for a magnet
Draw a diagram as a model for an object that is not magnetic.
Write an operational definition that explains how magnets interact with other magnets.
Where are magnets strongest?
Add representations of magnetic fields for each situtation.
Alnico - bar magnet
Flat ferrous magnet

Donut magnet
Magnetic field for magnets attraction
![]()
Magnetic fields for magnets repelling
![]()
Magnetic field for a magnet and an iron plate
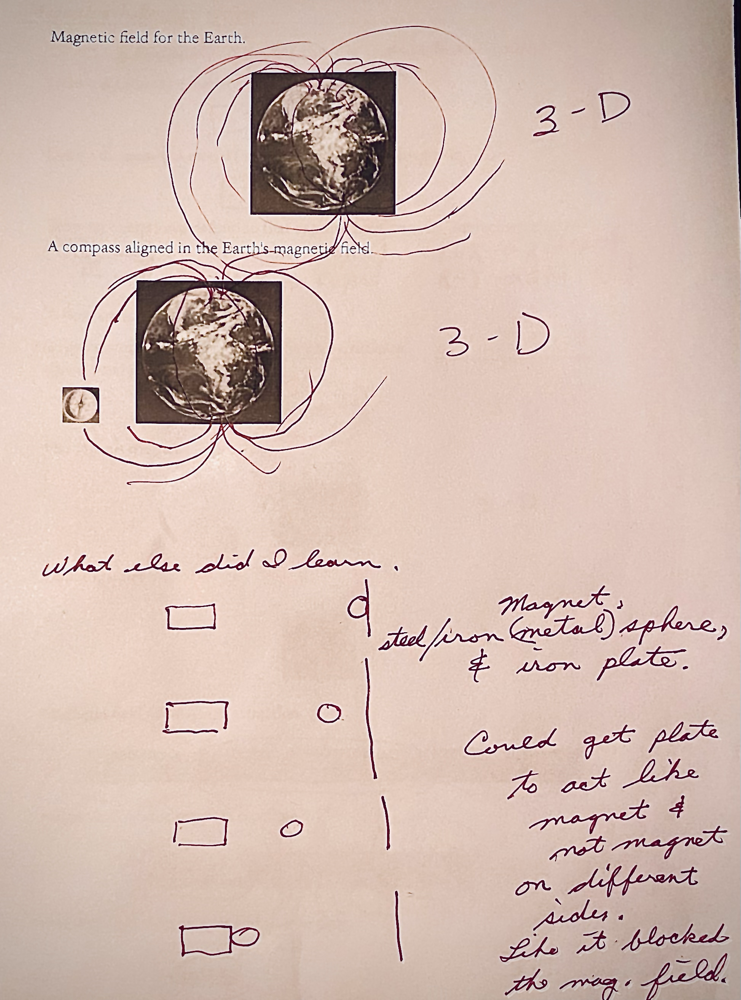
Magnetic field for the Earth.

A compass aligned in the Earth's magnetic field.
![]()
What else I learned?
Sample review responses

Sample review responses page 2
Support materials
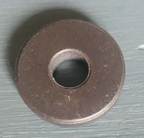
Magnets
Magnetic and nonmagnetic model
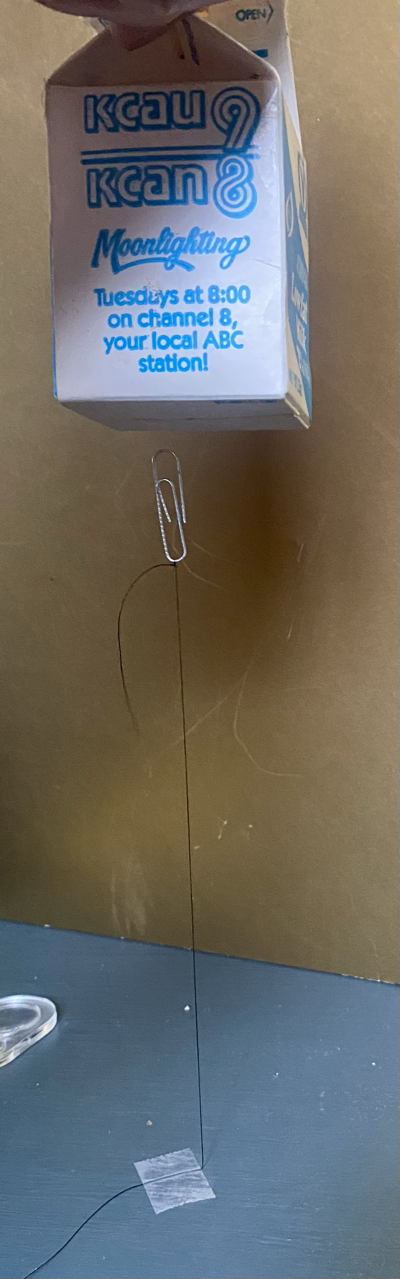
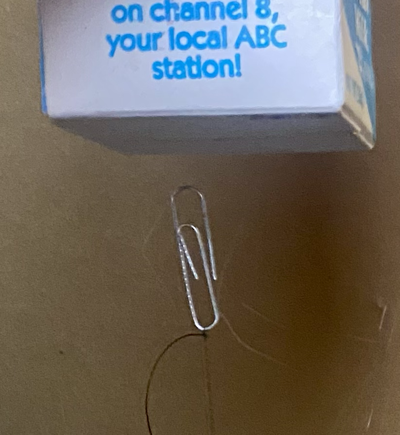
Floating paper clip
Materials
Paper clip , magnet, 2 milk cartons, thread, tape, stand.
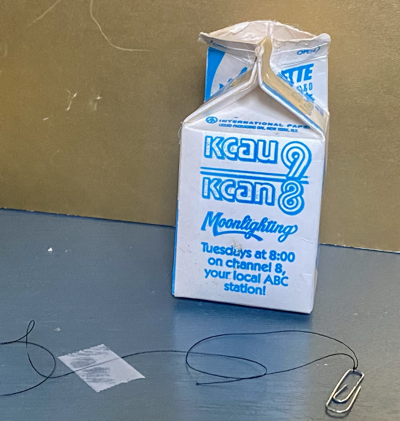
Preparation
I cut the bottom off a milk carton. Then I used another milk carton, opened the top, glued a magnet in the bottom, inserted the cut-off bottom into it, and glued the top half closed so it looked like a used milk carton.
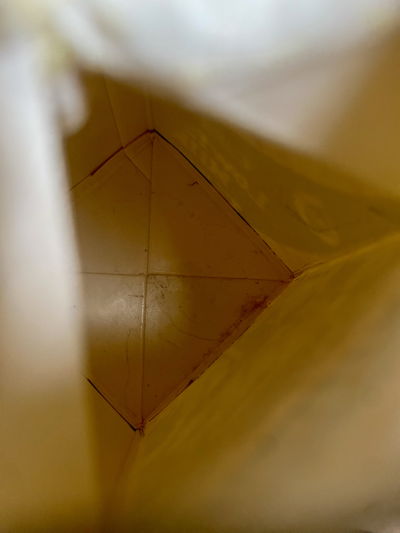

Set up a stand with a clamp and clamp the carton into it. Then adjusted the thread and paper clip so it would float with the thread taped to the table or bottom of the stand with a clamp.
Earth's Inner cores
Earth's poles - geographic and magnetic
Home: Pedagogy - theory, curriculum, learning, human development, & teaching
Home: Science - knowledge base, activities, pedagogical knowledge in all dimensions