Light, Shadows, & Color
A unit with lesson plans, activities, & lab notes
There are two ways of spreading the light: to be the candle or the mirror that reflects it. Edith Wharton
Introduction
- Introduction
- Big ideas, concepts, facts, & outcomes
- Science content concepts & outcomes
- Inquiry & science process concepts
- Pedagogical overview
- Activities sequence
- Focus questions
- Materials
- Scoring guide suggestions
- Unit activity sequence
- Activity 1 - KWHL
- Activity 2 - How does light travel?
- Activity 3 - Light & objects
- Activity 4 - Explore flat mirrors
- Activity 4.1 - Mirror, eye bolt, & string to describe light reflection from a mirror.
- Activity 4.2 - Mirror puzzles
- Activity 4.3 - Bouncing Light & text reflections -
- Activity 5 - Refraction & liquids
- Activity 5.1 - Bent pencil
- Activity 5.2 - Appearing coin or Magic penny
- Activity 6 - Lens & different liquids in cylindrical containers
- Activity 6.1 - Lens & two slit beams
- Activity 6.2 - Lens & candle - Sight & eye
- Activity 6.3 - Pin hole camera
- Activity 7 - Light & color - white light through colored filter
- Activity 7.1 - Colored objects in colored light
- Activity 7.2 - Colored paper reflections
- Activity 7.3 - Mixing colored light
- Activity 8 - Light, shadows, & their shapes
- Activity 8.1 - Light, shadows, & their properties
- Activity 8.2 - Use shadows & highlights to analyze works of art.
- Activity 8.3 - Light & shadows of different colors
- Review and .... Test
- Activity 9.1 -Prisms & light
- Activity 9.2 - Water lens
- Activity 9.3 - Turning colored light - white
- Activity 9.4 - Making fire from light
- Lab notes - directory with descriptions
- Support materials
- Word bank for light & shadow vocabulary
The information in this article steps through the thought process used to create a sequence of activities for a unit to study the properties and uses of light for middle grades and above.
The topic was selected by sixth grade learners in a small rural school, among other topics, at the beginning of the school year for them to investigate and learn during the year.
At the beginning of the year they were asked what they were interested in studying in their science class that year. During a grand discussion, they identified topics and considered possible activities and related information, that were then added to a list. One person asked, what were last year's students studying when she walked by the classroom and saw them working with the overhead lights out. I mentioned they were exploring light and color. So light and color was added to the list and it was one of the top topics they checked as being interested in exploring.
Now you might ask, how can the learners select the topics if there is a curriculum of study?
Well, there was, and I found that their selections were either in the school curriculum or could be integrated fairly easily. Before I did this, I did worry about it more than I needed.
While this plan was developed for two to three weeks of fifty minute periods in a science curriculum, one should also consider how it fits into the whole curriculum and more importantly, its value for life and life long learning. In doing this, along with how it relates to the dimensions of science. Three documents were written to communicate it. A philosophy, overview, and rationale.
Overview
This unit includes hands-on activities for learners to conceptualize concepts about the properties of light, the practice of science as inquiry, and how light interacts with objects and us in our lives. The activities will allow learners to make individual choices based on their present understanding. Choice that will personalize their learning to allow them opportunities to succeed at their developmental level and encourage positive attitudes.
They will experiment in pairs or small groups to explore the properties of light. They will think as scientists as they observe different properties, gather evidence, make explanations and models for the behavior of light and color, identify relationships and recreate them with light.
They will apply the concepts of light and its interactions with everything in their environment and demonstrate how light interacts with different parts of the eye and sends messages to the brain to be interpreted as sight. They will also explore how light and shadow are used in multimedia and different affects that result.
As they conduct their investigations they will learn how science is easily practiced with the processes of science to understand our world. Understanding which improves our quality of life to create better tools, technology, and aesthetics.
Philosophy
Science is inquiry about the universe. It is the creation of skills of inquiry and scientific generalizations about the physical objects, living organisms, earth and space around us and an understanding of their many relationships. Through our personal inquiries and the study of other scientist's inquiries we create a disposition for science as well as an understanding about the nature of science, its history, its personal and social perspectives, and its relationships to engineering.
This inquiry begins with children as they naturally explore their environment. Their explorations help them develop inquiry skills, create knowledge about their world and an attitude for exploration. In school teachers continue to facilitate this development by providing learning experiences where learners are actively involved in inquiry and communication about that inquiry in a community of learners. This involvement begins with engaging activities that allow them to focus, reflect, and assess what they know as they explore new and different ideas. During their exploration they will experience familiar and unfamiliar information which they will try to categorize with their existing understanding or use to construct new understanding.
To assist this construction they will negotiate its meaning with themselves, other learners, and the teacher until they are comfortable with their way of knowing. To push their understanding to its limits further questioning and or investigations will help them to translate and extend their understandings.
Learners must have a significant amount of success in a risk free and nourishing environment to sustain their curiosity and translate it to a love of learning and science. As they engage in these hands-on investigations, both teacher and learner initiated, the teacher must communicate how the dimensions of science are successfully integrated. To do so will help all learners understand the nature of what science is, how it has been developed over the years, its effect on society and society's effect on it, how it relates to them personally, its relationship to engineering, as well the process of science practices and how science helps us understand our world. Anything less will not prepare them as citizens of tomorrow.
Rationale
Light is an important part of our world. We are surrounded by it nearly every minute of the day. It is an essential part of our lives. Without it we would be limited in our ability to communicate and would not enjoy many of the images in our world. Many children, and possibly many adults, either take light and sight for granted or otherwise just simply do not understand it.
Educated citizens are informed of the properties of light its benefits and its harmful effects. For example, by knowing how light is energy and how it travels can improve the quality of life aesthetically and physically. How to protect our eyes from light of lasers, welding arcs, the sun (UV), and other harmful light sources. Children that study light can learn to better understand the world in which they live, make intelligent decisions, and better appreciate and live in the world around them.
Keeping these big ideas in mind and let the planning begin!
Planning information
Planning can be grouped into two big areas:
- Intended learnings - generally considers identifying learner's backgrounds and their intended learning. Then unpacking them to consider outc0mes and how to assess what learners know and how their learning will progress to achieve the planned outcomes.
- Pedagogy - using the intended learnings to consider strategies and activities to facilitate that learning. Which can be documented with lesson plans, activity plans, sequence of activities, and materials selected to use to achieve the intended learning outcomes.
Learner background information
A plan designed for learners who have prior knowledge in ...
- Cause and effect.
- Use of observations to make inferences, models as explanations for observable and non observable events.
- Relative position.
- How to manipulate the materials in a safe manner.
- How communicate results.
- Know how to work cooperatively in groups. If students do not, then cooperative lesson plans or model should be used to teach and reinforce skills necessary to work in groups
- cooperatively. See cooperative learning for ...
- Have a general understanding of how to draw diagrams and label them to collect observational data and to use it to answer questions.
General information on planning
After identification of a topic we can identify intended learnings as big ideas, concepts, and outcomes, a process referred to as unpacking. The following are identified and sorted into big life ideas and the dimensions of science.
Intended learnings & learners thinkings
Content Big ideas, concept & facts, & outcomes
(Source concepts & misconceptions)
Big ideas and specific outcomes:
Light and color are a type of energy that is important for life. Both for maintaining life and for the enjoyment of life.
Concepts and facts
- Light is necessary for life.
- Light is necessary to see objects, their shapes, color, and is helpful in navigating our world safely.
- Light and color are used in media to provide enjoyment and in some cases to manipulate our feelings in beneficial and harmful ways.
Outcome
Describe how light is important for life.
Science contents: physical, earth, life
Big ideas: Light is energy and has many unique properties that we use to see and enjoy our world.
Related concepts
- Light is energy.
- Light travels in a straight line until it strikes an object.
- Light can be reflected by a mirror, refracted by a lens, or absorbed by the object.
- Light interacts with matter by transmission (including refraction), absorption, or scattering (including reflection).
- To see an object, light is emitted by the object or reflected from it and enters the eye.
- Light is reflected at an angle proportional to the angle it strikes an object.
- Light is reflected at an angle proportional to the angle it strikes an object.
- Refraction is the bending of light when it travels through different transparent mediums.
- Light is refracted at an angle related to the angle that it enters or leaves a medium and the density of the mediums.
- Color is a property of light.
- White light has all colors. Black is the absence of light and/or color.
- Computer code #000 or #000000 has a value of zero, hence black. Code #fff or #ffffff has the highest value, hence white. Check out base 16 for explanation of f having a number value.
- White light can be refracted to view a spectrum.
- Light is a form of energy that can be transfered or changed to other forms of energy.
- Diffraction is the spreading out of waves after light passes through a narrow gap.
- An electromagnetic wave model and a photon model explain features of electromagnetic radiation each describe some common applications of electromagnetic radiation.
Outcome
- Describe and explain properties of light: how it travels, reflects, refracts, has color, and different ways it changes when it interacts with objects.
Anticipated learner thinkings & misconceptions
Inquiry, process, & science cross cutting concepts & skills
Inquiry
- When I experiment I collect observations that describe how different properties change (become variables) when objects and systems interact. This helps me make claims, explain what is happening, make models, and to predict what might happen in the future.
- Inquiry concepts
- Process concepts
- Perspective concepts
Cross cutting
Big ideas: See also Concepts & misconceptions
Our explorations of the world can be more better when we understanding inquiry and the processes (cross-cutting + more) used to observe, explore, and manipulate objects to observe interactions and changes to create explanations and models to understand and change our world for our survival and enjoyment.
Related concepts and facts
- Observational data and reasoning is used to explain interactions.
- Evidence is something that
is observed and can be used to understand what is happening and make predictions
and models about future changes.
- Models are structures that correspond to real objects, events, or classes of
events.
- Explanations are based on observation derived from experience or experimentation and are understandable.
- Pictures or symbols represent objects.
Outcome & specific outcomes
- Recognize science as inquiry.- Investigate properties of light through experimentation.
- Use systems, order, and organization - Color of the spectrum is in order. Order of opaque, translucent, transparent. Eye and sight,
- Use evidence, models, and explanations Use observational evidence to explain and verify conclusions such as: - Create an explanation for white and black. Light travels in a straight line. How shadows can be colored. Explanation for reflection, refraction, opaque, transparent, translucent.
- Use constancy, change, and measurement -
- Properties of light remain constant.
- Measure angle of incidence and reflections.
- Use evolution and equilibrium - light is in equilibrium.
- Use form and function The form of the materials determines the function. Transparent, translucent, opaque
Other possible concepts
Disposition, attitudes, values, habits of mind
- I can learn about the world around me by asking questions, making careful observations, and trying things.
- I can remember and understand better if I record information by writing, drawing, or using technology to record information.
- I need to be skeptical, because different explanations can be given for the same information and sometimes you can't tell which is better.
- It's fun to share what you know with other people.
- It's okay for people to have different ideas.
- I learn from others when I keep an open mind and listen to others ideas.
- Experiments that do not turn out the way that was predicted can still provide useful information.
- Investigation is an adventure that has been enjoyed by people everywhere and for all time.
Personal and Social
- The use of light for entertainment, art, and photography add enjoyment to life (aesthetic value).
History of science and development of technology - perspective of science
It took many years and many scientists to understand the properties and behavior of light. Investigate the history of light as wave and particle debate. Measuring the speed of light. And other related topics on STEM timeline.
See also Concepts & misconceptions also science, math, technology timeline
- People have practiced science and technology for a long time.
- Science develops over time.
- Science investigators such as
When intended learnings are identified, a map, diagram, or table can be used to begin to consider what information is needed to construct their understanding, activities to facilitate their learning, and ideas to assess progress.
| Concept | Supporting Information | Misconceptions | Assessment |
|---|---|---|---|
| Light travels in straight lines. |
|
|
Use a light source to explore how light travels
|
| Light interacts with objects. |
|
|
Use a light source and explore how it interactions with other objects. Objects that are translucent, transparent, opaque; objects for refraction - lenses, solids, liquids with different densities
|
| Light reflects from mirrors in a regular pattern. |
|
|
Explore how light reflects off of mirrors and other surfaces.
|
| Lenses can be used to focus light. |
|
Explore how light refracts when it passes through different objects, lenses, liquids, ...
|
|
| An object’s color is related to the light reflected and absorbed. |
|
Explore how white light refracts when it passes from one medium through another. Explore how colored light interacts with different colors?
|
|
| Shadows are determined relative to the objects shape and relative position to the light source(s). |
|
Explore shadows and how the position of the light source determine the position, shape, and size of the shadow.
|
|
| Experiments can be used to collect data and draw conclusions to explain interactions or events. | Explore how we can learn about the world when we observe and manipulate different objects to see what happens.
|
||
| Models can be used to explain interactions which can not be observed. | Explore how to make and diagrams to explain interactions (models).
|
After exploring concepts for light and color and unpacking supporting information, misconceptions, & assessment, we can consider scoring guide.
The following has three levels, for concepts related to light, and is written in two forms: narrative and tabular.
Scoring guides suggestions (rubric)
(Scoring guide)
Compacted as a narrative and in table form
Top level
- Demonstrates by explaining or drawing a picture that the angle of incidence is equal to the angle of reflection, the refraction of light depends on the density of the substance it travels through, that the color of an object is created from the reflection of that color and the absorption of all other colors, and white light is composed of all colors and will separate into different colors by refraction.
- Demonstrates by explaining or drawing a picture that shows light can be made to bounce off a mirror at different angles, light will bend when it passes through different substances, and visible light makes objects different colors by reflecting the color of the object.
- Demonstrates by explaining or drawing a picture that shows light will bounce off a mirror, light will change direction when it goes from one substance to another, and visible light can make different colors (by shinning on different colored objects).
Lower level
| Level | Path of light | Reflection and mirrors | Reflection of color | Refraction of color |
|---|---|---|---|---|
| Top level | Describes the path of light and it's interactions with objects as regular and dependent on their properties of matter or structures as transparent, opaque, translucent, reflective, and refractive. | Student demonstrates by explaining or drawing a picture - that shows light bouncing off a mirror. | Student demonstrates by explaining or drawing a picture - showing light will change direction when it goes from one substance to another. | Student demonstrates by explaining or drawing a picture - showing visible light can make different colors (by shinning on different colored objects). |
| Middle level | Describes the path of light as a straight line that can be reflected, refracted, and absorbed. | Student demonstrates by explaining or drawing a picture - shows light can be made to bounce off a mirror at different angles. | Student demonstrates by explaining or drawing a picture - visible light makes objects different colors by reflecting the color of the object. | Student demonstrates by explaining or drawing a picture - light will bend when it passes through different substances. |
| Lower level | Describes light as traveling from a source to a receiver in a straight line. | Student demonstrates by explaining or drawing a picture - that the angle of incidence is equal to the angle of reflection | The color of an object is created from the reflection of that color and the absorption of all other colors. Because white light is composed of all colors and will separate into different colors by refraction. | The refraction of light depends on the density of the substance it travels through. |
More ideas related to assessment
- Could use a checklist of concepts and activities to record learner’s progress.
- Learners lab notes or log or journal.
- Anecdotal records.
- Summative assessment will be based on the understanding of the concepts through the demonstration of the possible interactions of light with different objects.
- The following check list will be used.
| Dimension | Outcome | Yes | Comments |
|---|---|---|---|
| Personal / Social | Explain how light gets to a retina | ||
| System | Identify light systems and use the properties of the subsystems to explain the interactions | ||
| Describe the functions of the different parts of the subsystem in the interactions of the system | |||
| Physical science light |
Demonstrate how light reflects with mirrors. | ||
| Demonstrate how to use light boxes to explain how colored shadows are created. | |||
| Disposition | |||
| Art |
Light Assessment
Name:
Write as much as you can for each section within the alloted time.
1. Explain what could be happening to the light in the light box show below.
2. Explain what could be happening to the white light as it passes through the light box show below.
3. Explain what could be happening to the light in the light box show below.
4. Explain how you know your answers are accurate.
| Possible answers | Physical science: light concepts |
|---|---|
| Describe light travels in a straight line when not interacting with objects. | light travels in a straight line. |
| Describes how properties of light change when interacting with objects. Use the vocabulary: reflect, refract, & absorb. | light interacts with objects as it passes through them. |
| Describe objects: 3 as opaque, 4 as a mirrored surface , and object 5 as translucent. Use the vocabulary: opaque & translucent. Don't use transparent to describe these objects. May use as a counter example. | The surface of an object effects how light interacts with it. |
| Describe object 1 or 2 as a refractor. | light rays are refracted as they move from one medium to another. |
| Describe object 1 as focusing light onto object 4 | Lenses can be used to focus light. |
| Describe number 2 as a prism or refractor. | White light is a combination of many colors. |
| Describe light passing through object 1, 2, 3, as a result of its color. | An object’s color is related to the light reflected and absorbed. |
| Describe object 3’s shadow. | Shadows are determined relative to the objects shape and relative position to the light source(s). |
| Processes | |
|---|---|
| Observations can be used to explain properties of objects. | Uses data as observations to support descriptions. |
| Observations can be used to infer interactions. | Uses data to make inferences. |
| Models can be used to explain and make predictions. | Question four |
| Attitude | Express curiosity by doing experiments recording information, asking pertinent questions, or expressing wonder. |
| Vocabulary | Uses these words in their descriptions.
|
After we have an idea of intended learnings, supporting information, assessment levels, possible activities to provide opportunities to learn, and ways to assess. Then we can plan on how to sequence activities for learning opportunities and instructional methods and strategies to facilitate them.
Pedagogical Overview
Strategies to achieve educational learnings
Based on learning cycle theory & method
Activities Sequence to provide sufficient opportunities for students to achieve the targeted outcomes.
- Activity 1 - What do you know about light? KWHL chart - Diagnose what students background information and what they know about light. Use a K W L H or other strategy. Continue to update their list during the unit
- Activity 2 - How does light travel?
- Activity 3 - Explore how light passes through different objects
- Activity 4 - Explore flat mirrors - Use light box with one slit and draw light interacting with a flat mirror
- Activity 4.1 - Lead activity with mirror, eye bolt, and string for pairs to experience & create a rule to describe how light is reflected from a mirror.
- Activity 4.2 - Mirror puzzles
- Activity 4.3 - Bouncing Light & text reflections - written by Angela Miller and Katie Noda
- Activity 5 - Refraction activities with different liquids
- Activity 5.1 - Bent pencil
- Activity 5.2 - Appearing coin
- Activity 6 - Lens & light interactions with different liquids in cylindrical containers
- Activity 6.1 - Lens & two slit beams
- Activity 6.2 - Lens & candle - Demonstrate how the image of a lit candle can be project onto a sheet of paper by passing through a lens. Relate to eye.
- Shine light into mouth close eyes and see light above eye. Shine into sinuses above the eye and see below eye. How does the person see light? Or not?
- Chart light reflecting from objects into eye and being interpreted ... and nerve impulses sent to brain via optic nerve.
- Activity 6.3 - Pin hole camera
- Activity 7 - Light & color - white light through colored filter
- Activity 7.1 - Different colored objects in different colored light
- Activity 7.2 - Colored paper reflections
- Activity 7.3 - Mixing colored light
- Activity 8 - Light, shadows, & their shapes
- Activity 8.1 - Light, shadows, & their properties
- Activity 8.2 - Use shadows and highlights to describe works of art.
- Activity 8.3 - Light & shadows of different colors
- Review and .... Test
- Activity 9.1 - Using what I know to explain prisms & light - written by Angela Miller and Katie Noda
- Activity 9.2 - Using what I know to make a water lens - written by Angela Miller and Katie Noda
- Activity 9.3 - How can I use what I know to make colored light - white - written by Angela Miller and Katie Noda
- Activity 9.4 - Making fire from light? written by Angela Miller and Katie Noda
Focus question
Unit focus question:
What is light and how is it used?
Sub focus questions:
- What are its properties?
- What can it do?
- How does light interact with different materials?
- How do flat mirrors reflect light?
- What happens to light when it travels from one medium to another?
- How do you make a bent pencil illusion
- How do you make a coin appear?
- What is color?
- How is white light and colored light related?
- How are shadows made?
- Are there different kinds of shadows?
- What are the properties of light and shadows used in art?
Materials
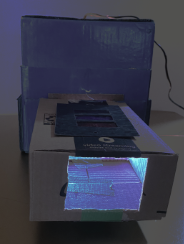
Light box with one slit
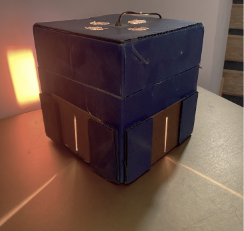
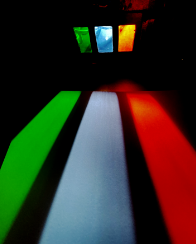
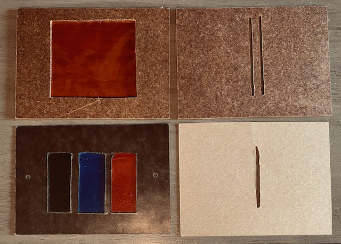
Light box with RGB filter
Directions for light box and masks. Click to enlarge

Sample masks (one color, two slits, three colors RGB, one slit - made from Masonite, pressed cardboard, and cardboard)
Light box with tunnel - blue light
Materials list
Light box, masks with one slit, two slits, colored - red, green, blue, triple colors RGB, blocks to hold objects, colored objects, objects for shadow, flat mirrors, convex lens (magnifying glass), paper, pencils, lab notes, cylindrical containers (olive jars, rectangular container, water, glycerin, alcohol, candle, sample art photos,
- Lab note 1 - What do you know about light? KWHL chart - Diagnose what students background information and what they know about light. Use a K W L H or other strategy. Continue to update their list during the unit
- Lab note 2 - How does light travel?
- Lab note 3 - Explore how light passes through different objects
- Lab note 4 - Explore flat mirrors - Use light box with one slit and draw light interacting with a flat mirror
- Lab note 4.1 - Lead activity with mirror, eye bolt, and string for pairs to experience & create a rule to describe how light is reflected from a mirror.
- Lab note 4.2 - Mirror puzzles
- Lab note 4.3 - Bouncing Light & text reflections - written by Angela Miller and Katie Noda
- Lab note 5 - Refraction activities with different liquids
- Lab note 5.1 - Bent pencil
- Lab note 5.2 - Appearing coin
- Lab note 6 - Lens & light interactions with different liquids in cylindrical containers
- Lab note 6.1 - Lens & two slit beams
- Lab note 6.2 - Lens & candle - Demonstrate how the image of a lit candle can be project onto a sheet of paper by passing through a lens. Relate to eye.
- Shine light into mouth close eyes and see light above eye. Shine into sinuses above the eye and see below eye. How does the person see light? Or not?
- Chart light reflecting from objects into eye and being interpreted ... and nerve impulses sent to brain via optic nerve.
- Lab note 6.3 - Pin hole camera
- Lab note 7 - Light & color - white light through colored filter
- Lab note 7.1 - Different colored objects in different colored light
- Lab note 7.2 - Colored paper reflections
- Activity 7.3 - Mixing colored light
- Lab note 8 - Light, shadows, & their shapes
- Lab note 8.1 - Light, shadows, & their properties
- Lab note 8.2 - Use shadows and highlights to describe works of art.
- Studio lighting picture
- Lab note 8.3 - Light & shadows of different colors
- Lab notes for review are left for learners to create as part of their assessment.
Resources
Lesson Plans
Activity 1 - What do I know about light?
Materials
Focus questions:
- What is light?
- What are its properties? (What can it do?)
Learning outcomes:
- Reflect on what each person knows about light, what they would like to learn, and how they might learn it. And record it in a KWHL chart.
Suggested procedures overview:
- Put learners in groups, focus their attention, and assess their initial understanding of the focus questions.
- Activity - Reflect on what each person knows about light, what they would like to learn, and how they might learn it. And record it in a KWHL chart.
Exploration -
- Put learners in pairs.
- Ask. What is light? record and display all ideas
- What are its properties? (What can it do?) record and display all ideas
- Have them fill out th KWHL chart.
Invention -
- Share the KWHL charts and provide a short overview of the different explorations they will participate in.
Discover
Unit motivational activity
Let students explore with the light boxes, masks, and different objects by inserting them into the path of the light source.
All the following activities.
Activity 2 - Explore how light travels
Materials:
- Three or four 5x8 in. cards with a hole punched in the center, ruler, a small wooden block for each, scissors, clay/glue/tacks, light box as source or flashlight.
- Lab note
Focus questions:
- How does light move?
Learning outcomes:
- Manipulate 3x5 cards in the light from the light source from the box to determine possible paths of light and describe them.
Suggested procedures overview:
- Put students in groups, focus their attention, and assess their initial understanding of the focus questions.
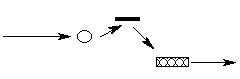
- Activity - Use a light source and several cards with holes to show that light travels in a straight line.
Exploration
- Put learners in pairs.
- Ask. How does light move? Accept all answers. Away from the source. In all directions, spreads out. Moves in a line. Straight line...
- Ask. How might we find evidence to support or reject our ideas?
- If needed show them the materials (cards, blocks, clay, and light source) and ask. How they might use them to answer the question.
- If learners do not think of an answer, give them instructions on how to manipulate the cards with a hole punched in each of them to align them to see if light will bend or go straight through multiple cards.
- Student directions in student log for light and color:
- Prepare the light source and light box with a polka-dot mask.
- Use the three cards with polka-dot holes in the center and clay.
- Place the cards so light will pass through all three cards.
- Record your results.
- Ask. How to record the data. Use lab notes and draw pictures.
- Ask. Are any more questions before you start?
- Ask. What are you going to do.
- Learners do the experiment and the teacher cruises the room.
- As learners conclude their explorations have them display some of their diagrams to share with the class in the invention.
Invention
- Recall and review
- Have the students put materials aside and move to their desks.
- Ask. What did you discovered from your explorations?
- listen to the students and move on when the time is appropriate.
- Ask the students how to display the results. Example below.
- See if students will discuss that the cards blocked the light and that light did not zig-zag around the cards and it travels in a straight line.
- Share diagrams that show the light disperses and
how it travels in a straight line.
Light is not a one point source therefore, it is coming from the source traveling through the hole in many lines that are not parallel. This could be one explanation of how the light spreads out in a ray. Another may be reflecting off of dust. Unless the light source is a laser, then the light will be more of a point source.

Discover
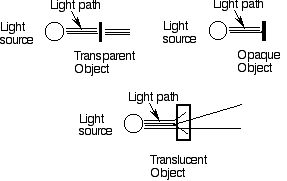
How light travels will be important to use in the coming activities to discover how light interacts with different objects and construct new concepts. Like how light interacts with different objects differently: opaque, transparent, translucent.
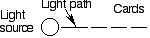
Activity 3 - Explore how light passes through different objects
Materials:
- light box (or flashlight or projector), mask with slit, sheets of white paper, 10-20 3x5 in. cards, ruler, a small wooden block for each, scissors, card, newspaper, clear drinking glass, wax paper, plastic bag, clear plastic food wrap, ice cubes, cloth, aluminum foil, cardboard, brown paper bag, plastic, glass of water, wall/door, glass of milk, wood strips
- Lab notes -
Focus questions:
- How does light interact with different materials?
Learning outcomes:
- Use 3x5 cards to measure the amount of light that passes through an object to rank order the amount of light that passes through each material (transparent, translucent, opaque).
- Create an explanation to explain how the light interacts with different materials differently.
- Create a model to explain the interaction based on the observational data, and discuss these ideas in a class discussion.
Suggested procedures overview:
- Put students in groups, focus their attention, and assess their initial understanding of the focus questions.
- Activity - Use 3x5 cards to rank order the amount of light that passes through each material (transparent, translucent, opaque), create a reason to explain how the light interacts with different materials differently, create a model to explain the interaction based on the observational data, and discuss these ideas in a class discussion.
Exploration
- Put learners in pairs.
- Ask What are properties of light?
- Start a list on board. If a student does not mention about how light travels ask them. Review in a straight line and sometimes spread out, like rays of light.
- Add the properties of light to the KWHL chart to add to it after each activity.
- Have them add how light travels to the appropriate column in their lab notes KWHL log.
- Ask How do objects interact with light? Accept all answers: bounce off, reflect, pass through, transparent, get absorbed, opaque.
- Today we’ll continue to study the nature of light and how different materials interact with it.
- And how different amounts of light will pass through some materials.
- I have these materials for you to test (newspaper, glass, wax paper, clear plastic food wrap, plastic strips, aluminum foil, cardboard, brown paper bag, wood, glass of water, glass of milk, ice cubes,...) to see what light does when it hits them.
- Discuss with learners what they will do.
- Possible procedure
- Prepare the light box and light source with a one-slit mask.
- Place the objects in the path of the light.
- If light passes through the object, then put a card on the far side of the object.
- If light passes through the card, then add cards until it does not.
- Record your results as zero cards = object blocked all light or the number of cards needed before the light was blocked.
- If they do not think of using the cards to measure the amount of light, then wait until someone suggests or desires to measure the amount of light and ask how the cards could be used? May want to hold a card in front of light source and add cards until light is blocked to demonstrate.
- Ask how they are going to do the experiment.
- Ask the entire class what two pieces of information they will record for each object. Does light travel through the objects? And if it does, Through how many cards does light travel?
- Darken the room, have them do the experiment, record their findings in their lab notes and you cruise the room.
Invention
- Have the students put materials aside and move to their desks.
- Ask the students what they discovered from the experiment.
- listen to the students and move on when the time is appropriate.
- Ask the students how to display the results.
- Draw the chart on the board or on a transparency.
- Have students record their results.
- Discuss the results.
- Ask how they can organize it into categories.
- Try to lead them to three categories. Group them by the number of cards the light shines through (operational definition)
- Define and introduce the vocabulary for the categories: transparent, translucent, and
opaque.
- Translucent: an object that reflects or absorbs enough light so that an object can’t be seen through it, but light passes through it.
- Transparent: an object that allows things to be seen clearly through it because it absorbs or reflects little light.
- Opaque: an object that reflects or absorbs visible light.
- Tell. Them to make a models (draw a diagram) to show how light interacts with the three kinds of objects.
- Have students draw pictures.
Discovery
Select two objects, from outside the classroom, you are familiar with and describe how you would say if each is transparent, opaque, or translucent when light interacts with them.
Use ideas with following activities.
Next activity is light interactions with mirrors.
Activity 4 - Explore flat mirrors
Materials
- flat mirrors, a light source, sheets of white paper, ruler, mask with slit, protractor
- mirror patterns in lab notes
- Lab note 4 - mirror & light
- Lab note 4.1 - mirror & string
- Lab note 4.2 - mirror puzzles
- Lab
Focus questions:
- How do flat mirrors reflect light?
- Do all flat mirrors reflect light in a particular manner?
- Can you solve these mirror puzzles?
Learning outcomes:
- Manipulate mirrors to draw incident and reflected rays, communicate the results to the class and resolve any differences based on observational data.
Suggested procedures overview:
- Put students in groups, focus their attention, and assess their initial understanding of the focus questions.
- Activity - Manipulate mirrors to draw incident and reflected rays, communicate the results to the class and resolve any differences based on observational data.
Exploration
- Put learners in pairs.
- If learners had ideas on their KWHL charts about mirrors, then use it to introduce the activity. If the lesson is to be teacher directed, then take a mirror and turn it a variety of ways to shine a spot of light around the classroom.
- Tell students they are going to observe how mirrors interact with light.
- Refer to lab notes.
- Have the students read the directions.
Student Directions in student log for mirrors:
- Put a mask with one slit on the light box.
- Place a sheet of paper flat on the table.
- Draw how the light interacts with the mirror (if needed, give hint: draw a line for the light going into the mirror, trace around the mirror, and draw a line for the light reflecting from the mirror).
- Draw arrows to show the direction of the light for at least three different positions of mirror and light.
- Tell. Explain and model what you will do.
- Cruise the room while students explore.
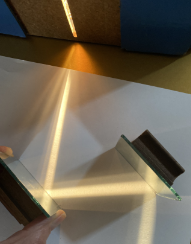
Invention 4.1 - mirror & string exploration
- Have the learners set the equipment aside and display their diagrams so everyone can see them.
- Have learners discuss and verify the observations they collected.
- Ask. Do you see a pattern?
- Use mirror and string apparatus to explore reflection angles.
Photos of mirror and string apparatus to explore reflection angles.
Apparatus with close up of string, eye screw, & protractor
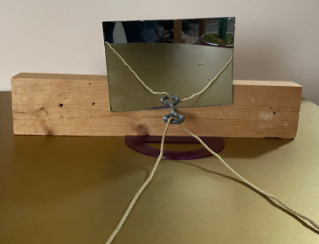
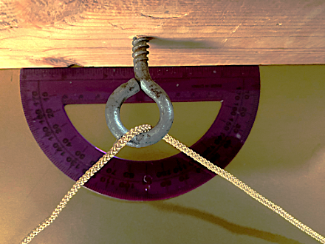
Start with mirror backwards
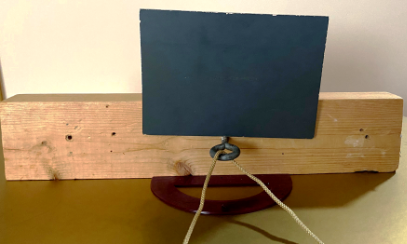
- Demonstrate mirror reflection apparatus.
- Place a mirror on the board above the eye screw (mirrored side away from the the front side with the eye bolt and string. For now).
- Have one person take one end of the string and move away from the mirror toward one side of the room.
- Have another person take the other end of the string, that passes through the eye bolt and move toward the other end of the room.
- Tell them to pretend the mirror is facing them and position themselves so they might be able to see each other in the mirror.
- Discuss with them and ask the rest of the class for suggestions about their positioning.
- Adjust as desired. When they are satisfied, turn the mirror around and see how close they are to being able to see each other.If they can't, then have them move until they can see each other.
- Then place a protractor with zero below the eye bolt and other learners read and record the angles.
- Let other pairs try their luck by having one person move somewhere on one side of the flipped mirror, then have another person move to where they think they will be able to see their partner when the mirror is flipped around. Adjust their positions if necessary and measure and record the angles.
- Continue till everyone has an opportunity to paticipate and are satisfied with the results.
- Record findings in lab notes.
- Have them go back and review their diagrams from earlier and measure the angle of the light going into the mirror and the angle of the light reflecting from the mirror with a protractor.
- Have them state and write a rule to describe how light is reflected from a mirror.
- Introduce vocabulary.
Vocabulary:- Incident ray: the light ray going into the mirror.
- Reflected ray: the light ray going out of the mirror.
- Absorb: to take in light.
- Reflect: to bounce or redirect light.
- Diffuse: to reflect in different directions.
- Have students relate what they learned to a ball bouncing.
- Demonstrate by bouncing balls off a wall and showing the angles with string.
Discover - 4.2 mirror puzzles
Describe how to adjust a rear view mirror, in a vehicle, to see a vehicle behind you in a lane to the driver's right.
Challenge them to solve the mirror puzzles by drawing where mirrors should be placed to get the light to follow the path on the diagram.
When they think they are done, have them use a mirror to check.
Manipulate mirrors to create patterns of reflected rays.
Communicate the results to the class and resolve any differences based on observational data.
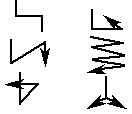
- Challenge students to use the light box and mirror(s) to create patterns similar to the following.
- Tell them when they know how to place the mirrors to make the pattern. Draw and label where you would place the mirror for each pattern that you are able to make.
- Cruise the room while the students collect the data.
- When students finish challenge them to make some of their own and have classmates solve them.
Mirror Patterns
Discover - 4.3 Bouncing Light & text reflections - written by Angela Miller and Katie Noda
Materials
Textbook, three mirrors, pencil, paper, flashlight, Activity Log
Focus question
How does light travel?
Outcome
- Explain how light is reflected off of mirrors.
- Explain how light reflected from a mirror is different than if the person was put into the mirror.
Procedure
- Ask. How does light travel?
- Have learners write their names on a piece of paper and look at it in the mirror.
- Look in the mirror.
- Tell. Touch the right sides of their faces.
- Notice the side of your face the mirror image touched.
- Stand the textbook up in the middle of your desk.
- Point the flashlight at the front side of the textbook and turn it on.
- Without moving the textbook or the flashlight, cooperate with your partner and use three mirrors to make the flashlight beam shine on the backside of the textbook.
- Try doing this different ways.
- Then, draw diagrams in your Lab notes of the paths the light takes to get to the other side of the textbook. Show where the mirrors were.
- Did you draw the placement of the mirrors and the path the light took?
- Ask. What are some ways you could do to make use of the bouncing light?
- Ask. What path did the light take to get to their eyes?
Refraction activities
Activity 5 - Refraction activities with different liquids
Materials:
- Light boxes, mask with one slit, paper, pencils, rulers, protractors,
- Liquids: alcohol, water, glycerin or heavy oil.
- Transparent container, water, pencil
- Small opaque container with penny glued to bottom, water
- Lab notes -
Focus questions:
- What happens to light when it travels from one medium to another?
- Have you ever tried to drop a coin into the small cup inside a larger cup filled with colored water?
- What happens to light as it travels from one medium to another? (air to water to air)
Learning outcomes:
- Explain how light travels from one medium to another? (air to water to air)
Suggested procedures overview:
- Put students in groups, focus their attention, and assess their initial understanding of the focus questions.
- Activity - Explore activities to see and explain how light travels from one medium to another? (air through liquids to air).
Exploration
- Organize learners into pairs and groups.
- Ask. What happens to light when it travels from one medium to another?
- How could you design an exploration to show what happens to light when it travels through different mediums? Accept all answers.
- If necessary, suggest they could use the light source with one slit and shine light through different containers with different mediums and trace the path of light as it goes through each container and liquid.
- Setup the materials, explore, and draw diagrams to show light passes through the empty container and three liquids of different densities. (alcohol, water, glycerin)
Invention
- Display diagrams of containers before and after and with different liquids.
- Arrange them according to how light is refracted.
- Try other explorations about refraction: pencil, coin, ...
Discover
Bent pencil
- Have you ever seen a pencil bend when it was put into water?
- Fill the clear container with water, insert the pencil into the water and observe.
- Observe the pencil seems bent?
- Sketch how light travels from a source to the pencil, reflects and travels to your eye.
Disappearing coin
- Have you ever tried to drop a coin into the small cup inside a larger cup filled with colored water?
- Place the butter dish with the penny in the center of a table or desk and have students gather around so all can see the penny. Have them back up so the penny just disappears. While the are stationary pour water into the butter dish until the penny appears.
- Discuss observations and draw light reflected from the coin and before water and after water.
Activity 6 - Lens & light interactions with different liquids in cylindrical containers
Materials
- light source, mask with two slits, sheet of white paper, protractor, cylindrical containers (olive jars work well) jars with alcohol, glycerin, oil, & water, ruler.
- Lab notes 6 - liquids in cylinder containers
- Lab notes 6.1 -
- Lab notes 6.2 -
- Lab notes 6.3 -
Focus questions:
- How does light interact with different lens?
Learning outcomes:
- Explore and explain how light interacts with different liquids in cylindrical containers.
- Explore and explain how light travels through a magnifying lens.
- Describe how an image travels through a convex lens.
- Relate the lens experiment to how an eye works.
- Tell how the lens and eye experiment relate to a camera.
Suggested procedures overview:
- Put students in groups, focus their attention, and assess their initial understanding of the focus questions.
- Activity - Explore and explain how light travels through different liquids in cylindrical transparent containers, through a magnifying lens, an image through a lens,lens in an eye, and images in a pin hole camera.
Exploration
- Organize learners into groups and pairs.
- Demonstrate how to set up the equipment
- Put the two-slit mask on the light source.
- Place a cylindrical container in the beams.
- Adjust the placement of the lens as desired.
- Record observations.
- Repeat with with different liquids
- Check for understanding and let explore.
Invention
- Regroup as a class and have groups demonstrate how light travels through different liquids.
- Summarize that light travels in a straight line but bends or refracts when it enters or leaves a different medium.
Discover 6.1 - Hand lens or magnifying glass
Materials
- light source, mask with two slits, sheet of white paper, protractor, hand lens or magnifying glass
- Lab notes 6.1 -
Challenge
Explore how light interacts with a hand lens or magnifying glass
Exploration
- Organize learners into groups and pairs.
- Demonstrate how to set up the equipment
- Put the two-slit mask on the light source.
- Place the hand lens or magnifying glass in the beams.
- Adjust the placement of the lens as desired.
- Record your observations.
- Sketches with description of how light refracts
- Check for understanding and let explore.
Invention
- Regroup as a class and have groups demonstrate how light travels through the lens (magnifying glass).
- Summarize that light travels in a straight line but bends or refracts when it enters or leaves a different medium.
Discover 6.2 - Lens & candle
Materials
- Candle, sheet of white oak tag, clay or something to hold the oak tag up like a screen, lens or magnifying glass
- Lab notes 6.2 -
Challenge
Explore how light from the candle will project an image of the candle onto the oak tag.
Exploration
- Organize learners into groups and pairs.
- Demonstrate how to set up the equipment
- Set the oak tag so it is perpendicular to the top of a table.\
- Place the candle about a meter away from the screen.
- Light the candle.
- Darken the room
- Hold the lens or magnifying glass between the candle and the screen.
- Move the lens between the candle and the screen to focus the image of the candle on the screen.
- Draw a sketch of the candle and lines to show how the light travels from the candle to the screen.
Invention
- Regroup as a class and have groups demonstrate how light travels through the lens (magnifying glass).
- Review that light travels in a straight line but bends or refracts when it enters or leaves a different medium.
- Explain: We know light travels in a straight line so the light from the top of the flame will travel straight to the lens. The same for light from the middle of the flame, the wick in the flame, the top of the candle, and the bottom of the candle.
We can see on the image on the screen is upside down so again knowing light travels in a straight line, the light from the top of the flame has to come out of the lens and travel in a straight line to the top of the flame toward the bottom of the screen. Same for light from different points on the image.
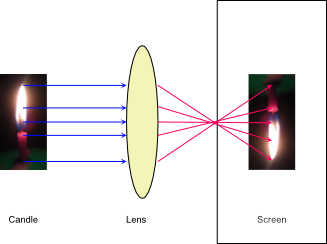
Sketches with description of how light refracts
Relate this to the anatomy of an eyes or to our human eye? Notice the lines of light on the picture. How do they compare to your results with the lens and candle?
Research on light and sight understanding
The lens in our eye focuses the image upside down on the retina. Our brain turns it right side up. Experiment with inverting glasses and video
Discover 6.3 Pin hole camera
Materials
- cardboard box big enough to insert your head with about a foot of empty space on one side of your head.
- Lab notes 6.3 -
Challenge
Make a pin hole camera
Exploration
- Organize learners into groups and pairs.
- Demonstrate how to set up the equipment
- Use a box that can be completely closed.
- Cut a hole on one side big enough to insert your head, with about a foot of empty space on one side.
- On one end of the box tape or glue a white sheet of paper where the image will be displayed.
- On the opposite end of the box cut a small hole about one square inch or one inch diameter.
- Cover the hole with aluminum foil and tape around the edges.
- Make pin hole in the center of the foil.
- Take the box to a window or outdoors, stick your head in and observe the image on the screen directly opposite of the pin hole.
- Explore and sketch and explain what you observe.
Invention
- Regroup as a class and have groups demonstrate how light travels through the lens (magnifying glass).
- Review that light travels in a straight line but bends or refracts when it enters or leaves a different medium.
Activity 7 - Light & color - filters
Materials
- White light source, white paper, colored filter mask, tunnel, different colored objects
Focus questions:
- How is white light and colored light different?
Learning outcomes:
Explore different colored filters and make a model to show what happens to white light that passes through different colored filters.
Suggested procedures overview:
- Put students in groups, focus their attention, and assess their initial understanding of the focus questions.
- Activity -
Exploration
- Organize learners into groups and pairs.
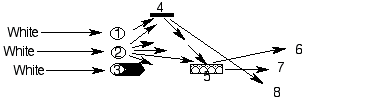
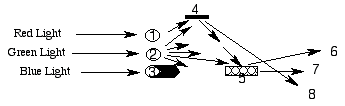
- Place one filter at a time between the white light source and a piece of white paper inside the tunnel.
- Record your observations and explanations
| Color of filter | Observed color on white paper | Explanation for color observed |
|---|---|---|
| Green | green | Each filter filters all the colors from the white light except for the color of the filter. The color of the filter shines on the white paper and is reflected of it to your eye. |
| Red | red | |
| Blue | blue | |
| Yellow | yellow | |
| Other if available |
Invention
- Regroup as a class and share their findings.
- Have a discussion to explain the observations. Each filter filters all the colors from the white light except for the color of the filter. The color of the filter shines on the white paper and is reflected to your eye.
- Ask. What colors do you think will be reflected from objects that are different colors?
- Let's try ...
Discover 7.1 - Light & color - different colored objects in different colored light
Materials
- White light source, white paper, colored filter mask, tunnel, different colored objects
Focus question
What colors do you think will be reflected from objects that are different colors?
Outcome:
Explore different colored objects in different colors of light and make a model to show what happens to white light that passes through different colored filters and hits different colored objects.
Exploration
- Organize learners into groups and pairs.
- Place one filter at a time (red, blue, green) between the white light source and different colored objects (red, blue, green, yellow, ...) inside the tunnel. See chart in invention or
- Record your observations and explanations.
- Repeat with other filters and objects.
- Record your observations.
Invention
- Regroup as a class and share their findings.
- Ask. What did you observe when you put different colors into the tunnel with different colors of light shining in?
- Ask. What color do you think is reflected from different colors of paper when white light shines on them?
| Color of light | Color of object | Observed color of object | Explanation for color observed |
|---|---|---|---|
| Green | Green | Green | Green light is reflected from green objects |
| Green | Red | Black | Green light is absorbed by red objects |
| Green | Blue | Black | Green light is absorbed by blue objects |
| Green | Yellow | Black | Green light is absorbed by yellow objects |
| Red | Green | Black | Red is absorbed |
| Red | Red | Red | Red light is reflected from red objects |
| Red | Blue | Black | Red is absorbed |
| Red | Yellow | Black | Red is absorbed |
Discover 7.2 - Light & color - Colored paper reflections
Materials
- Light source, white paper, color filters, colored paper.
Focus question
What color do you think is reflected from different colors of paper when white light shines on them?
Outcome:
Explore what colors are reflected onto a white paper when you shine white light on different colored papers. Then, reflect that light onto a white paper as if it was a mirror.
Exploration
- Organize learners into groups and pairs.
- Set up a light source with one slit.
- Move a colored paper like a mirror and reflect the light onto a white sheet of paper.
- Repeat the procedure with different colors of paper.
- Display results to share with the class.
| Color of paper | Color reflected | Explanation Draw a diagram showing how the white light shins on the paper and what happens to all the colors ... |
|---|---|---|
| Red paper | ||
| Green paper | ||
| Blue paper | ||
| Other paper |
Invention
- Regroup as a class and share their findings.
- Ask. What did you observe when you reflected white light off of different colors of paper?
Discover 7.3 - Mixing colored light
Materials light source, white paper, color filters, colored paper, mirrors, set of filters.
Focus question
What did you observe when you reflected white light off of different colors of paper?
Outcome:
Explore mixing different colors by reflecting two or more different colors onto white paper.
Exploration
- Organize learners into groups and pairs.
- Set up a light source with one slit.
- Record results
- Display the results so all can see them.
| Colors | Mixed color |
|---|---|
| Red mixed with green | |
| Red mixed with blue | |
| Green mixed with blue | |
| Brain buster mix RGB | |
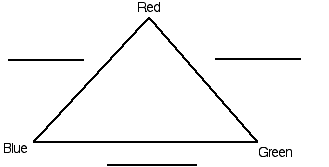
Record the colors on the triangle below.
Invention
- Regroup as a class and share their findings.
- Ask. What did you observe when you mixed different colors of light?
- Share results and invent explanations.
- When red and blue light are mixed they are both reflected as purple or magenta.
- When red and green light are mixed they are both reflected as yellow.
- When blue and green light are mixed they are both reflected as blue green or cyan.
- RGB are primary colors of light.
- RGB are mixed they are reflected as white .... FINALLY observations to prove white light is a combination of all colors
Discover
How do video screens make color? RGB ...
Activity 8 - Light, shadows, and their shapes
Materials
- Light source, white paper, different objects, sphere
- Illuminated sphere photo
- Child La Tour photo
- Lab notes
Focus questions:
- What causes shadows?
- What are the properties of shadows and highlights?
- How are shadows and light used in art?
- Can shadows be colored?
Learning outcomes:
- Describe how shadows are made.
- Describe the properties of shadows and highlights.
- Use shadows and highlights to describe works of art.
- Find and make shadows with different colors.
Suggested procedures overview:
- Put students in groups, focus their attention, and assess their initial understanding of the focus questions.
- Activity - Explore shadows and highlights, their properties, color, and how they are used to create emotions in art, photography, and videos.
Exploration - shadow shapes
- Organize learners into groups and pairs.
- Place a white sheet of paper on the table so the light source will shine over it.
- Place an object in the light.
- Sketch the shadow.
- Repeat with other objects.
- Make a shadow puzzle activity for your classmates.
- Can place objects into the tunnel and put a white sheet of paper on one end of the tunnel as a screen so the shadow is cast onto the screen.
- Then secretly put objects into the tunnel and have others guess what the objects are by the shadows they cast.
Invention
- Regroup as a class and groups demonstrate their projects.
- Ask. What have you learned about shadows?
Discover 8.1 - Light, shadows, & their properties
Materials: light source, white paper, sphere.
Focus question
What are the properties of highlights and shadows.
Outcome
Take a picture or sketch a sphere in light and describe the shadows and highlights.
Exploration - light & shadow properties
- Organize learners into groups and pairs.
- Place a white sheet of paper on the table so the light source will shine over it.
- Place a sphere in the light.
- Take a picture or make a sketch of the lights interaction on the sphere and paper.
- Describe the different shades and highlights.
- Display sketches so everyone can view.
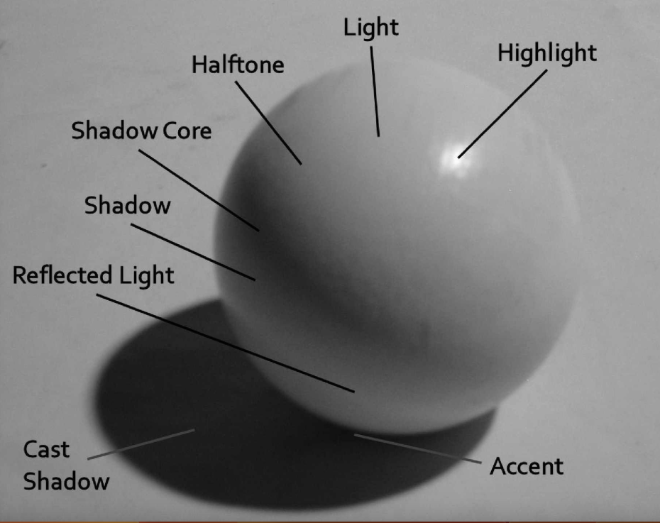
Invention
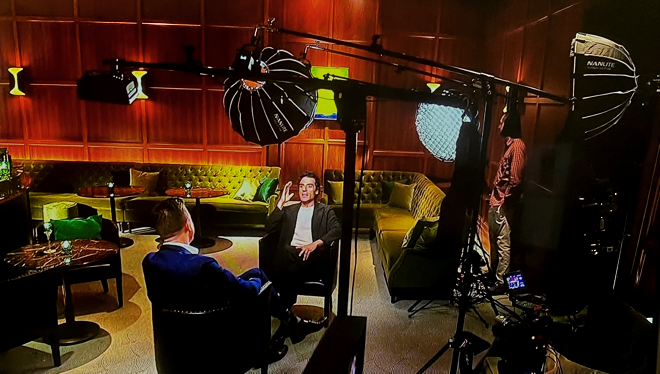
- Regroup as a class and have each group share their diagram, compare them, and decide what what properties of light and shadow are displayed. Use the sphere in light photo and discuss what they believe is the accurate and what vocabulary can be used to describe the properties of light and shadow.
- Tell. You are going to review some famous works of art to review how light and shadows are used.
- Therefore, it would be good to agree on some vocabulary to use to describe the light and shadow.
- So let's compare our sketches of our spheres in the light to the labeled sphere in the light vocabulary and agree on what each property looks like and what we will call them.
- Make or select a master list and sketch to illustrate properties of light and shadow.
- Cast shadow
- Shadow core
- Shadow
- Highlight
- Accent
- Reflected light
- Halftone
- Light
- Ask. What have you learned about shadows?
- Let's see if we can use it to analyze art.
Discovery 8.2
Materials
Sample pieces of art
- The newborn child La Tour
- Studio lighting during an interview
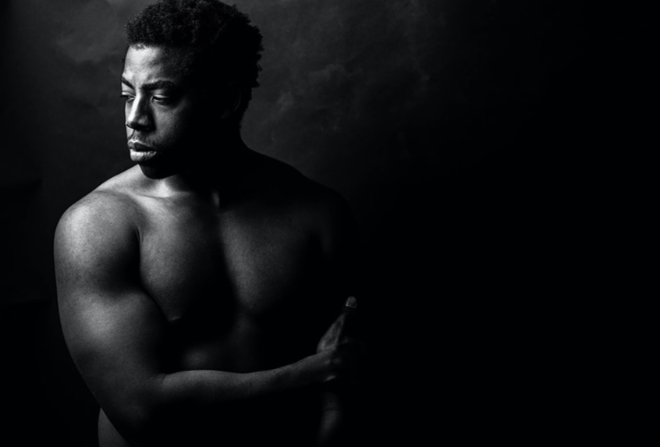
- Sample portrait photograph with chiaroscuro lighting
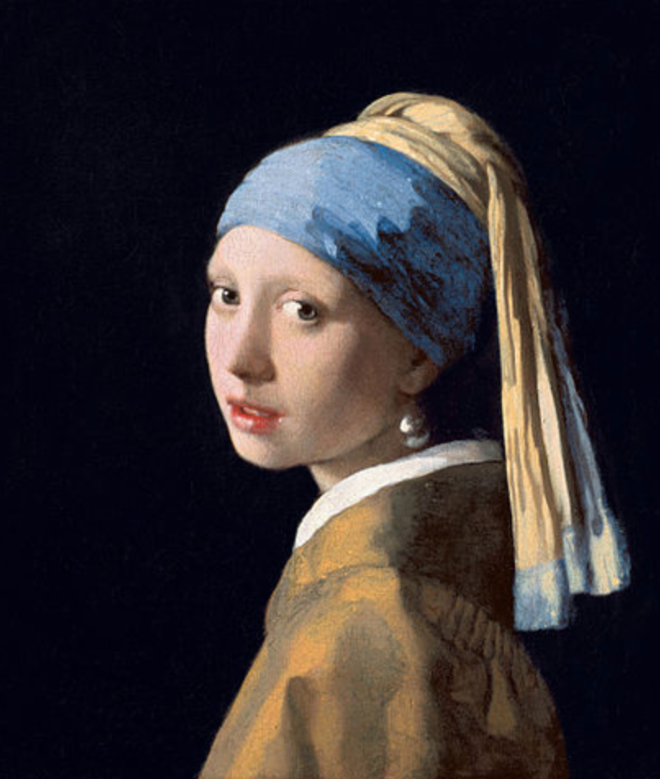
- Sample painting with chiaroscuro lighting
- Sample photograph with Rembrandt Lighting
- Lab notes
Focus questions:
- How are shadows and light used in art?
Learning outcomes:
- Use shadows and highlights to describe works of art.
Exploration
- How do photographers, artists, videographers use light and shadows?
- Select some works of art and analyze them.
- Lets look at some pieces of art and describe how light and shadow are used.
- Find the source of the light and see if you can use the different vocabulary for light and shadow to describe it. Cast shadow, Shadow core, Shadow, Highlight, Accent, Reflected light, Halftone, Light
- Analyze one at a time.
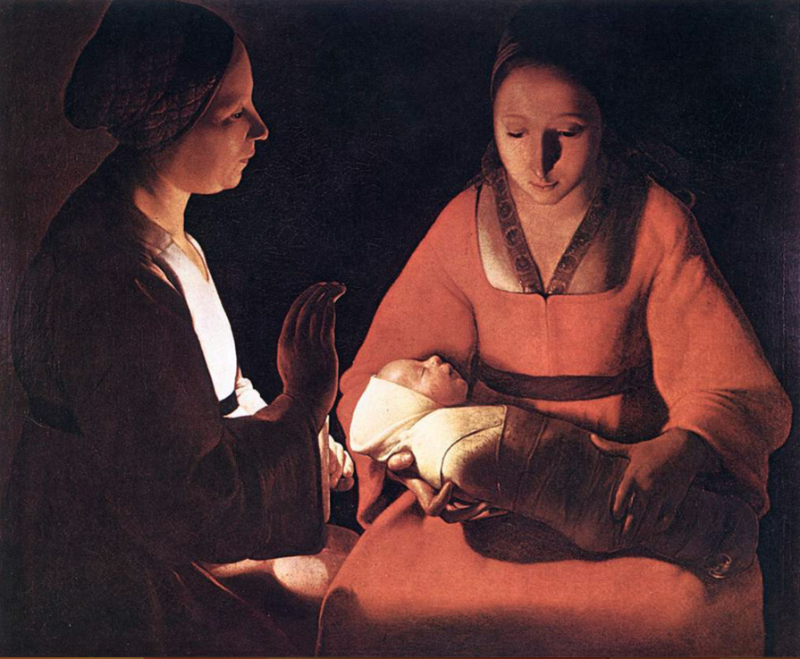
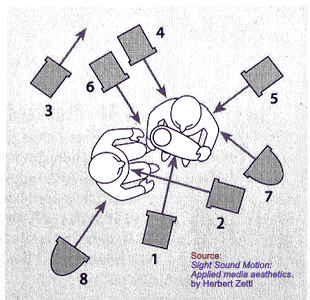
Possible lighting setup for La Tour's The Newborn Child
- Key light for woman A
- Key light for woman B
- Background light to set off woman B
- Kicker to rim head and shoulder of A
- Kicker to rim right shoulder and arm of A
- Back spot to rim hand and illuminate child
- Soft fill to slow falloff on A
- Soft fill to slow falloff and reveal some detail on back of B
Sample studio lighting
Sample portrait photograph with chiaroscuro lighting
Sample painting with chiaroscuro lighting
Sample photograph with Rembrandt Lighting

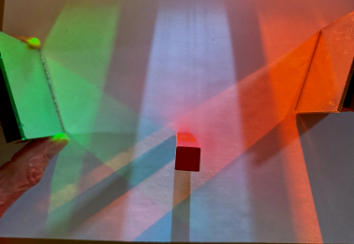
Discovery 8.3 - Light & shadows of different colors
Materials: light source, white paper, three colored filter RGB, Cuisenaire rod or similar
Focus question
Can shadows be colored?
Outcome
Make shadows with different colors and describe the sources of light.
Exploration
- Place a white sheet of paper on the table so a three-colored light source(RGB) will shine over it.
- Place a rod vertically in red light.
- Sketch the ray of light, rod, and shadow.
- Record the color of the shadow and ray.
- Explain your results.
- Place a stick vertically so that it is in red and blue light
- Sketch the rays of light, rod, and shadow
- Record the color of the shadows and rays
- Explain your results
- Place a rod vertically so that it is in red, blue, and green light
- Sketch the rays of light, rod, and shadow
- Record the color of the shadows and the rays
- Explain your results
Activity 9.1 - How can I use what I know about light to explain prisms & light? written by Angela Miller and Katie Noda
Materials
- Prism, light source, white sheet of paper
- Lab notes to be created by learners as part of assessment
Focus questions:
- How can I use what I know to answer questions about light?
Learning outcomes:
- Use ideas about how light travels, refracts, white light, and color to explain how light interacts with a prism.
Suggested procedures overview:
- Put learners in groups, focus their attention, and assess their initial understanding of the focus questions.
- Activity - Use ideas about how light travels, refracts, white light, and color to explain how light interacts with a prism.
Exploration -
- Put learners in pairs.
- Ask. Have you ever heard of a prism?
- What can it do? record and display all ideas
- How do they work? record and display all ideas
Possible Procedure
- Ask. What is white light?
- What colors come from flashlights?
- Explore with the prism, flashlight, and paper.
- See what colors you can make and what colors make white light.
- Record results with a drawing of white light and with colors.
- If some learners need assistance, have others demonstrate how to create a spectrum of colored light.
Invention -
- Share the results.
- Discuss and explain what is happening in the prism to refract the light into colors.
Discover
Ask. Where else they might be able to find white light and colored light.
Activity 9.2 - How can I use what I know about light to make a water lens? written by Angela Miller and Katie Noda
Materials
- foam cup, plastic wrap, transparent tape, dropper, objects, newspaper, water, scissors
- Lab notes to be created by learners as part of assessment
Focus questions:
- How can I use what I know to make a magnifier?
Learning outcomes:
- Use ideas about how light travels, refracts to make and explain a magnifier.
Suggested procedures overview:
- Put learners in groups, focus their attention, and assess their initial understanding of the focus questions.
- Activity -Use ideas about how light travels, refracts to make and explain a magnifier.
Exploration -
- Put learners in pairs.
- Tell. Describe a magnifying glass and the purpose of one.
- Ask how they could make one? record and display all ideas
- Ask if they know that they can make one out of water?
- If yes, ask how? record and display all ideas
- Create a procedure to make a water lens.
Possible Procedure to make a water lens- Cut the half-inch rim from the foam cup.
- Cut a circle an inch larger than the rim of the cup from the plastic wrap.
- Stretch it tightly over the rim. Tape it down and under the edge.
- Place a few drops of water on top of each other in the center of the plastic wrap using a dropper. This is your water lens.
- Then place objects and a sheet of newspaper under the water lens, and observe the objects.
- Tell them that after they create their water lens they should explore with it by putting objects and a newspaper under it and seeing what happens. Then they should make a picture and write an explanation to describe how it works.
- Explore
- Have them display their diagrams an explanations so everyone can view them.
Invention -
- Share the results.
- Discuss and explain what what the found.
- Review the diagrams for how the light enters, refracts, and is spreads out the light to enlarge the image observed.
- Could also mention how the light is spread out more when it enters their eyes....
- Ask. Why they suppose the objects and the newspaper looked they way they did under the water lens?
- What happens when you add more or less water to the lens?
- Why is the water lens similar to a magnifying glass?
Discover
Ask. Where else they might they find lenses.
Activity 9.3 - How can I use what I know to make colored light - white - written by Angela Miller and Katie Noda
Materials
- Three flashlights, colored cellophane (red, blue, green), paper, pencil, white construction paper, tape, use stage light gel if possible
- Lab notes to be created by learners as part of assessment
Focus questions:
- How can I use what I know to make colored light white.
Learning outcomes:
- Use ideas about light to make white light.
Suggested procedures overview:
- Put learners in groups, focus their attention, and assess their initial understanding of the focus questions.
- Activity -Use ideas about light to make white light.
Exploration -
- Put learners in pairs.
- Ask how they could make white light? record and display all ideas
- Ask if they remember that they can it from RGB light?
- If yes, ask how? record and display all ideas
Possible procedure- Tape a piece of cellophane over the bulb end of each flashlight.
- Turn out the lights.
- Cooperate with your partners to shine the three flashlights on the white piece of construction paper so all the light beams meet.
- Explore with the flashlights, moving the beams around so they cross over each other until you get white light.
- Record results.
- Tell them that after they create white light they can explore with different-colored pieces of construction paper and note the colors they make.
- Then they should make a picture and write an explanation to describe how it works.
- Explore
- Have them display their diagrams an explanations so everyone can view them.
Invention -
- Share the results.
- Review the diagrams and explanations they made.
- Discuss and explain what what the found.
- Ask. What makes up white light?
- Performance Assessments: red+blue=magenta, blue+green=cyan, red+green=yellow
Discover
Ask. Where they might see red, green, and blue dots. (T.V.)
Activity 9.4 - Making fire from light? written by Angela Miller and Katie Noda
Materials
- Pieces of lightweight paper (1x1 inch piece of tissue paper), aluminum tray, safety goggles, light source (sun), magnifying glass, container of water, a controlled environment
- Lab notes to be created by learners as part of assessment
Focus questions:
- How can I use what I know to use light to make fire?
Learning outcomes:
- Use ideas about light and magnifying glass to make fire from light.
Suggested procedures overview:
- Put learners in groups, focus their attention, and assess their initial understanding of the focus questions.
- Activity - Use ideas about light and magnifying glass to make fire from light.
Exploration -
- Put learners in pairs.
- Ask. How can you use what you know to use light to make fire? record and display all ideas
- Ask what would be a procedure to make fire from light?
Possible procedure- Use the lens to concentrate the light and heat onto a 1x1 inch piece of tissue paper.
- Discuss safety procedures and rules before beginning the activity.
- Carefully listen to and follow any directions given by the instructor.
- Only use the tissue paper squares.
- Keep the tissue paper in the aluminum tray at all times.
- Keep their hands to themselves, unless directed differently by the instructor.
- Do not push, shove, or run at any given time.
- Wear their safety goggles at all times.
- Patiently wait to take turns to do the activity.
- Teacher models the activity for the learners.
- Under the supervision of the instructor. Each will have an opportunity to experiment with different angles of the magnifying glass and the sun in order to burn/set fire to the paper.
- After their turn, they should make a picture and write an explanation to describe how it works.
- Explore
- Have them display their diagrams an explanations so everyone can view them.
Invention -
- Share the results.
- Discuss and explain what what the found about how to use light to create heat with a lens.
- Review their diagrams and explanations of how light and heat is concentrated.
- Ask. What happens when light interacts with certain objects (books, clothes, lenses)
Discover
Ask. Where could this could used in real-life situations?
- Knowledge base of physical science concepts and misconceptions
- Research on light and sight understanding
Lab Notes for light & color activities
Lab notes 1 - What do you know about light?
Materials
- Lab notes
Focus questions:
- What do you know about light?
Challenge - complete the KWHL chart.
What do you know about light? List what you know about light and continue to add what you want to learn, how to find out, and what you learn; during your study of light and color.
K What do I know? |
W What do I want to know? |
H How will I find out? |
L What have I learned? |
|---|---|---|---|
|
Lab notes 2 - Explore how light travels
Materials
- Light source, mask with polka dot slit, sheets of white paper, four or five 5x8 in. cards with a hole punched in the center, ruler, a small wooden block for each, scissors, clay/glue/tacks, light box as source or flashlight.
- Lab note
Focus questions:
- How does light move?
Challenge
Manipulate 3x5 cards in the light from the light source from the box to determine possible paths of light and describe them.
Possible procedure:
- Prepare the light source and light box with a polka-dot mask.
- Use the 3X5 inch cards with polka-dot holes in the center and clay.
- Can the cards be placed so light will pass through all of the cards?
- Record your results.
Set up and results
Describe an example where you have seen light travel in a straight line.
Lab notes 3 - Explore how light interacts with different objects
Materials
- light source, mask with slit, sheets of white paper, wax paper, newspaper, cardboard, brown paper, glass, aluminum foil, plastic strips, plastic bag, cloth, wood strips, 3x5 cards, ice,...
Focus questions:
- How does light interact with different materials?
Challenge
Explore how light interacts with different materials.
Possible procedure:
- Prepare the light box and light source with a one-slit mask.
- Place the objects in the path of light.
- If light passes through the object, put a 3x5 card on the far side of the object.
- If light passes through the card, then add cards until it does not
- Record your results for the eight objects.
Results:
| Object | Material | Number of cards light traveled through after |
|---|---|---|
| Clear plastic | ||
| Clear glass | ||
| Wax paper | ||
| Wood strip of block | ||
Order the materials from least light to most light.
Select two objects, from outside the classroom, you are familiar with and describe how you would say if each is transparent, opaque, or translucent when light interacts with them.
Lab notes 4 - Mirror puzzles
Materials
Light source, slit mask, mirrors, puzzle sheet
Focus questions:
- What solutions can you find for these puzzles?
Challenge
Solve the mirror puzzles.
Procedure
Use the light box with one slit mask to create the following patterns.
Draw and label where you placed a mirror so light makes the lines in each pattern.
Pattern 1
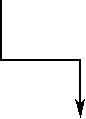
Pattern 2
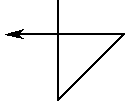
Pattern 3
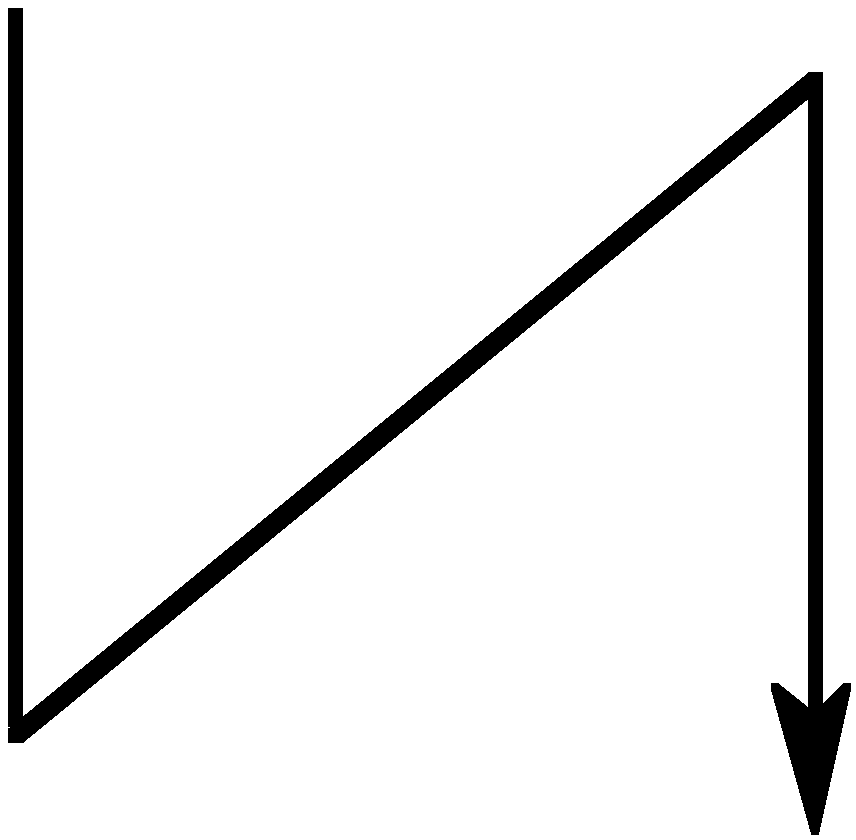
Pattern 4
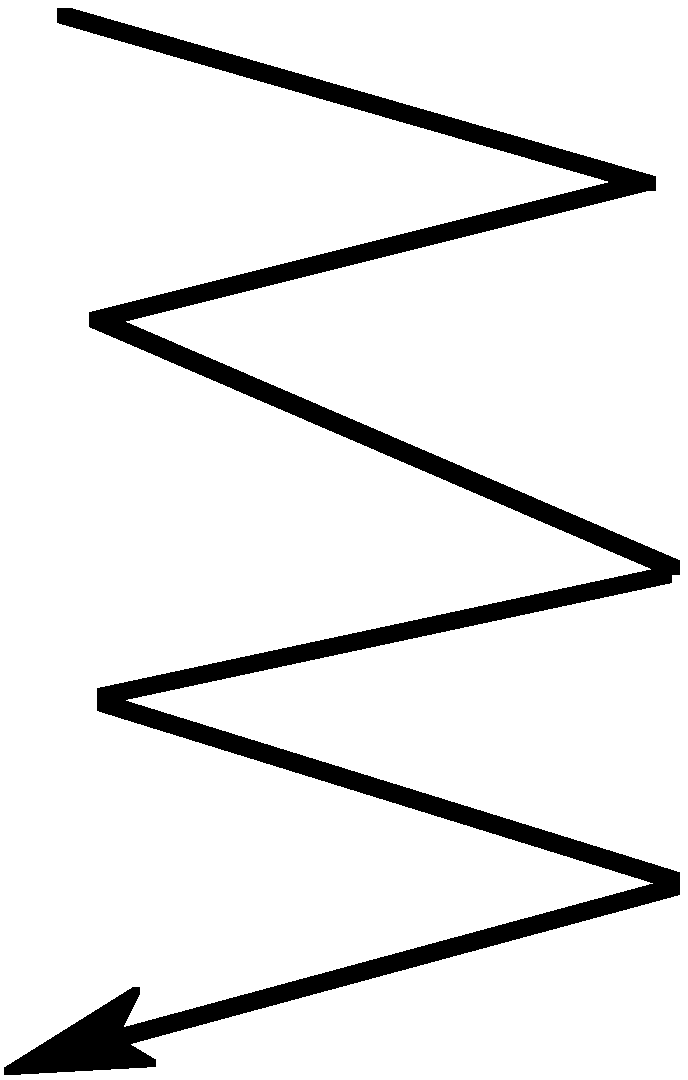
Pattern 5
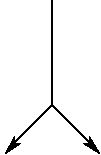
Brain buster:
Make some of your own and have classmates solve them.
Lab notes 4.1 - Exploring mirrors
Materials
- Board with eye hook, mirror, and string
- Light source, mask with slit, mirrors, paper, pencil, ruler, protractor
- Lab notes
Focus questions:
- How does light reflect from mirrors?
Challenge
Describe how light is reflected from a mirror.
Suggested procedure
Put a mask with one slit on the light box.
Place a sheet of paper flat on the table.
Draw how the light interacts with the mirror. (Hint: draw a line for the light going into the mirror, trace around the mirror, and draw a line for the light reflecting from the mirror.)
Did you draw arrows to show the direction of the light?
Describe how to adjust a rear view mirror, in a vehicle, to see a vehicle behind you in a lane to the driver's right.
Brain buster: Measure the angle of the light going into the mirror and the angle of the light reflecting from the mirror. Think of a rule to describe how light is reflected from a mirror.
Lab notes 5 - Refraction activities -Investigate how light interacts with liquids.
Materials
- Light source, mask with one slit, sheet of white paper, rectangular container, protractor, alcohol, glycerin (or heavy oil), water, and ruler.
Challenge
Explain how light travel from one medium to another (air to water or water to air).
Suggested procedure
- Use the mask with one slit to make a light ray.
- Put a white sheet of paper on the desk. (you can tape the paper so it won't move if you want to use the same sheet of paper to draw how the light travels through air, alcohol, water, and glycerin on the same sheet).
- Place a rectangular container on top of the paper.
- Position it so that the light ray shines through the box at an angle other than 90 degrees.
- Rotate the box to see how changing its position changes how the ray refracts.
- Select one position.
- Trace around the container, and sketch the light ray as it enters, travels through the container, and leaves it, on your paper.
- Repeat the process by adding the different liquids into the box.
- Describe how the angles compare?
Lab notes 5.1 - Refraction challenges - Bent pencil
Materials
- Clear container, water, pencil
- Lab notes
Challenge
Explain how the pencil seems to bend.
Suggested procedure
- Place the pencil in the clear container.
- Draw a sketch of how light is shining on the pencil, reflecting to your eye and how you see the pencil.
- Fill the clear container with water and insert the pencil.
- Observe from the side and how the pencil seems bent.
- Sketch how light travels from a source to the pencil, reflects (from above and below water) and travels to your eye.
- Discuss.
Sketch before water
Sketch after water
Hint: some of the light only travels in air and some light travels through air, water, and air again.
Lab notes 5.2 - Refraction challenges - Appearing penny
Materials
- Butter tub (or shallow opaque container) with penny glued to bottom center, and water.
- ab notes
Challenge
Explain how the coin can appear.
Suggested procedure
- Place the butter dish with the penny in the center of a table or desk and have everyone gather around so all can see the penny.
- Next have everyone back up so the penny just disappears.
- While the are stationary, pour water into the butter dish.
- The penny will appear.
Sketch before water
Sketch after water
Hint: Light travels from the water to air and then to everyones eye.
Lab notes 6 - Lens & light interactions with different liquids in cylindrical containers
Materials
- light source, mask with two slits, sheet of white paper, protractor, cylindrical containers (olive jars work well) jars with alcohol, glycerin, oil, & water, ruler.
Challenge
Explore how light interacts with different liquids in cylindrical containers
Possible procedure
- Put the two-slit mask on the light source.
- Place a cylindrical container in the beams.
- Adjust the placement of the lens as desired.
- Record your observations.
- Repeat with others with different liquids
Sketches with description of how light refracts
Lab notes 6.1 - Hand lens or magnifying glass
Materials
- light source, mask with two slits, sheet of white paper, protractor, hand lens or magnifying glass
Challenge
Explore how light interacts with a hand lens or magnifying glass
Possible procedure
- Put the two-slit mask on the light source.
- Place the hand lens or magnifying glass in the beams.
- Adjust the placement of the lens as desired.
- Record your observations.
- Repeat with others with different liquids
Sketches with description of how light refracts
Lab notes 6.2 - Lens & candle
Materials
- candle, sheet of white oak tag, clay or something to hold the oak tag up like a screen, lens or magnifying glass
Challenge
Explore how light from the candle will project an image of the candle onto the oak tag.
Possible procedure
- Set the oak tag so it is perpendicular to the top of a table.
- Place the candle about a meter away from the screen.
- Light the candle.
- Darken the room
- Hold the lens or magnifying glass between the candle and the screen.
- Move the lens between the candle and the screen to focus the image of the candle on the screen.
- Draw a sketch of the candle and lines to show how the light travels from the candle to the screen.
Sketch of candle & image
How does this relate to the human eye?
Lab notes 6.3 - Pinhole camera
Materials
- cardboard box big enough to insert your head with about a foot of empty space on one side of your head.
Challenge
Make a pin hole camera
Possible procedure
- Use a box that can be completely closed.
- Cut a hole on one side big enough to insert your head, with about a foot of empty space on one side.
- On one end of the box tape or glue a white sheet of paper where the image will be displayed.
- On the opposite end of the box cut a small hole about one square inch or one inch diameter.
- Cover the hole with aluminum foil and tape around the edges.
- Make pin hole in the center of the foil.
- Take the box to a window or outdoors, stick your head in and observe the image on the screen directly opposite of the pin hole.
Sketches how the light travels in the camera
Lab notes 7 - Light & color - filters
Materials
- White light source, white paper, colored filter masks, tunnel, different colored objects
Challenge:
Explore different colored filters and make a model to show what happens to white light that passes through different colored filters.
Suggested procedure:
- Place one filter at a time between the white light source and a piece of white paper inside the tunnel.
- Record your observations and explanations
| Color of filter | Observed color on white paper | Explanation for color observed |
|---|---|---|
| Green | ||
| Red | ||
| Blue | ||
| Yellow | ||
Lab notes 7.1 - Light & color - different colored objects in different colored light
Materials
- White light source, white paper, colored filter masks, tunnel, different colored objects
Challenge:
Explore different colored objects in different colors of light and make a model to show what happens to white light that passes through different colored filters and hits different colored objects.
Suggested procedure:
- Place one filter at a time between the white light source and different colored objects inside the tunnel.
- Record your observations and explanations
Objects of different colors placed into the tunnel with different colors of light shining in.
| Color of light | Color of object | Observed color of object | Explanation for color observed |
|---|---|---|---|
| Green | Green | ||
| Green | Red | ||
| Green | Blue | ||
| Green | Yellow | ||
| Red | Green | ||
| Red | Red | ||
| Red | Blue | ||
| Red | Yellow | ||
Lab notes 7.2 - Colored paper reflections
Materials
Light source, white paper, color filters, colored paper.
Challenge:
Explore what colors are reflected onto a white paper when you shine white light on different colored papers. Then, reflect that light onto a white paper as if it was a mirror.
Suggested procedure:
- Set up a light source with one slit.
- Move a colored paper like a mirror and reflect the light onto a white sheet of paper.
- Repeat the procedure with different colors of paper.
Results
| Color of paper | Color reflected | Explanation Draw a diagram showing how the white light shins on the paper and what happens to all the colors ... |
|---|---|---|
| Red paper | ||
| Green paper | ||
| Blue paper | ||
| Other paper |
Lab notes 7.3 - Mixing colored light
Materials: light source, white paper, color filters, colored paper, mirrors, set of filters.
Challenge:
Explore mixing different colors by reflecting two or more different colors onto white paper.
Results
| Colors | Prediction |
|---|---|
| Red mixed with green | |
| Red mixed with blue | |
| Green mixed with blue | |
Record the colors on the triangle below.
Lab notes 8 - Light, shadows, and their shapes
Materials: light source, white paper, and different objects.
Challenge:
Describe how shadows are made. Find and make shadows with different colors.
Possible procedure
- Place a white sheet of paper on the table so the light source will shine over it.
- Place an object in the light.
- Sketch the shadow.
- Repeat with other objects.
- Make a shadow puzzle activity for your classmates.
Lab notes 8.1 - Light, shadows & their properties
Materials: light source, white paper, sphere
Challenge:
Describe shadows and highlights.
Possible procedure
- Place a white sheet of paper on the table, place a sphere on it, shine a light on it, and make shadows and high lights.
- Take a picture or make a sketch of the lights interaction on the sphere and paper.
- Describe the different shades.
- Compare your photographs or sketches to the labeled photo of a sphere and its highlights and shadows.
- Decide what different properties of light and shadow can be seen and what they can be called.
Lab notes 8.1 - Light & shadows in art
Analyze pieces of art
- The newborn child La Tour
- Sample portrait photograph with chiaroscuro lighting
- Sample painting with chiaroscuro lighting
- Sample photograph with Rembrandt Lighting
- Lab notes
Challenge:
Analyze how are shadows and light are used in art.
- How do photographers, artists, videographers use light and shadows?
- Select some works of art and analyze them.
- Find the source of the light.
- Describe how different kinds of light and shadow are used. Cast shadow, Shadow core, Shadow, Highlight, Accent, Reflected light, Halftone, Light
Sample portrait photograph with chiaroscuro lighting
Sample painting with chiaroscuro lighting
Sample photograph with Rembrandt Lighting
Lab notes 8.3 - Light & shadows of different color
Materials:
- Light source, white paper, colored filter RGB, Cuisenaire orange rod
- Illuminated sphere photo
Challenge:
Make shadows of different colors on the white paper.
Possible procedure
- Place a white sheet of paper on the table so a three-colored light source will shine over it.
- Place a rod vertically in red light.
- Sketch the ray of light, rod, and shadow.
- Record the color of the shadow and ray.
- Explain your results.
- Place a stick vertically so that it is in red and blue light. (Use a mirror to manipulate one of the colored light)
- Sketch the rays of light, rod, and shadow
- Record the color of the shadows and rays
- Explain your results
- Place a rod vertically so that it is in red, blue, and green light (Mirrors ...)
- Sketch the rays of light, rod, and shadow
- Record the color of the shadows and the rays
- Explain your results
Can you make a white shadow?
Support materials
Sphere with light & shadow
The Newborn Child LaTour - Light & shadows
Studio lighting - Light & shadows
Sample portrait photograph with chiaroscuro lighting
Sample portrait painting with chiaroscuro lighting
Rembrandt lighting
Magic penny appears
Word bank for light & shadow vocabulary
Absorb
Accent
Angle of incidence
Angle of reflection
Angle of refraction
Blue light
Cast shadow
Chiaroscuro lighting
Convex lens
Diffuse
Flat mirror
Green light
Halftone
Highlight
Incident ray
Lens
Light
Mirror
Opaque
Red light
Reflect
Reflected light
Reflected ray
Reflection
Refraction
Rembrandt lighting
RGB
Shadow
Shadow core
Translucent
Transparent
White light
Home: Pedagogy - theory, curriculum, learning, human development, & teaching
Home: Science - knowledge base, activities, pedagogical knowledge in all dimensions